There can be a lot of action going on in the crawlspace. Since most home owners rarely if ever enter the crawlspace it is an area of much concern. The foundation walls and piers, girders, joists, subfloor, plumbing, electrical, insulation and sometimes HVAC is located there. Sump pumps or dehumidifiers could also be located there. The inspector will have to report what he observes going on with these systems. On older homes these systems may have been amateurishly upgraded several times over or neglected for years. A leak here could go unnoticed until major damaged is caused. Below we’ll discuss some of the issues we find but first I wanted to show a picture of what a good crawlspace looks like for comparison reasons.
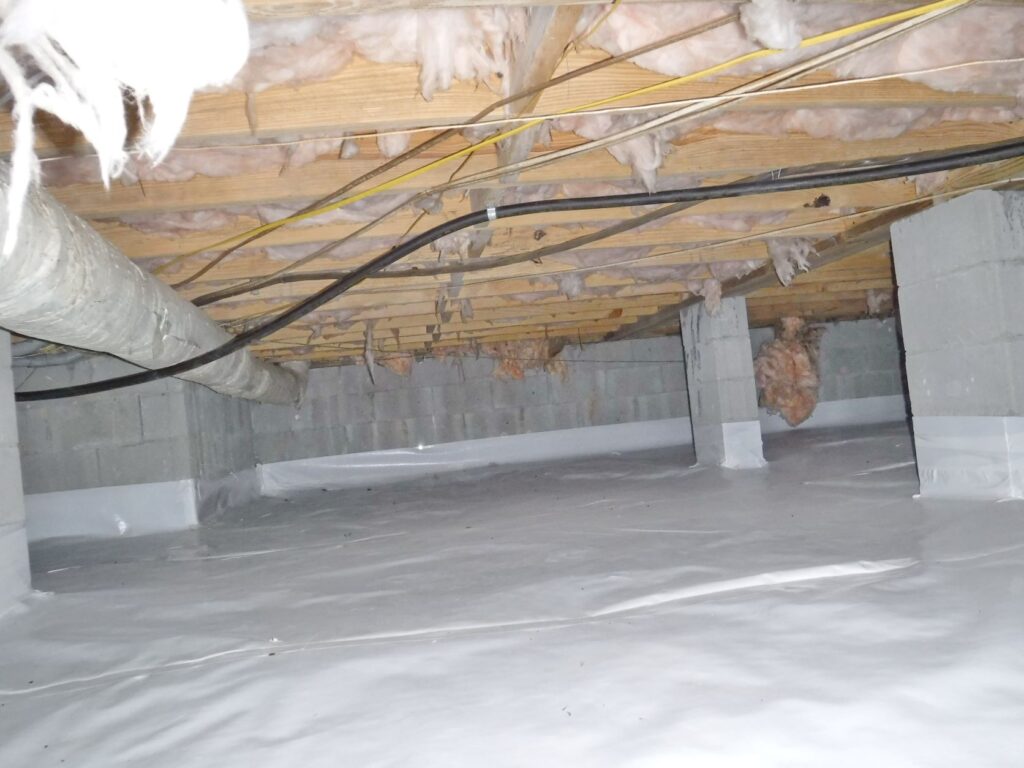
This is an example of a crawlspace vapor barrier done correctly. “What is a vapor barrier”? you might ask. The vapor barrier is that thick piece of plastic laid on the ground. Its purpose is to prevent ground moisture from evaporating into the crawlspace area where it would raise the humidity in that space. High humidity in the crawlspace can cause condensation on subfloor, joists, ductwork etc. and eventually it will promote microbial growth (mold). The mold growing on wood is actually using the wood as a food source so if left uncorrected long enough it will cause decay and structural issues caused by rot.
Notice several things about this job.
- The vapor barrier is thick and durable. We recommend 6 mill or greater but this is probably 10 or 12 mill. It’s more expensive but your home is worth it. Some types are thin or not sunlight resistant so sometimes over time they decay. I often find the clear plastic decayed where the sun shines through the foundation vents.
- There is complete coverage. (no gaps). In my tests in places were the vapor barrier is missing the humidity rises 10 to 20%. It also goes up the sides of the block a ways. Block can absorb moisture from the ground and can release it into the crawlspace. So it makes sense to go up the sides a bit and wrap the piers. It is also taped at the seams and lapped enough to protect the seams from separating.
- The grade is level under the home. Low spots are common along the perimeter and water will flow into these low spots releasing moisture during rain events. On a good job the grade should be leveled out.
- There can be no chance the crawlspce will flood. If there is or if the crawlspce grade is below the level of outside the house then a sump pump system may be needed also.
- In the example above it shows an encapsulated crawlspace (no foundation vents) but it doesn’t have to be. If the vapor barrier is well applied on a vented crawlspace then the objective may be met without adding a dehumidifier and sealing the crawlspace off.
- So basically there are two types of crawlspaces, well…actually three. The ventilated type and the encapsulated type which is not ventilated (for the most part). More on that later. There is another type called the conditioned crawlspace where the living area shares a HVAC vent/s with the crawlspace area.
- Moisture management in the crawlspace really begins with the outside of the home. On older homes the grade around the outside may have changed over the years due to a variety of factors. Water should flow away from the home in all directions. On flat or low lots this may be a challenge to improve.
Before we go into detail about the moisture issues in crawlspaces we’ll discuss some of the other items we inspect in the crawlspace.
Insulation, Ventilation and Vapor Barrier
Insulation requirements vary according to the climate zone. Around here (Charleston SC area) the climate zone is 3a and R-19 is required in the crawlspace for ventilated systems and unvented systems. The exception would be unvented crawlspce with an insulated foundation wall and a well applied vapor barrier according to a particular process in the code rules. See 2012 IRC N1102.2.10 or R408.1-3, energy efficiency section.
Adding a vapor barrier may reduce your ventilation requirements. There are specific rules about what is allowed. However if you’re having high moisture reading or microbial growth on framing in the crawlspace then a vapor barrier will help provided it’s done correctly. The closer the framing is to the ground the more likely it’ll be affected by ground moisture.
Ventilation requirements for vented crawlspace systems is 1 square foot for each 150 sq ft of floor area. The rules allow you to reduce this if a properly applied vapor barrier is applied. See R 408.1-3. However for most ventilated systems the more ventilation the better.
Now let’s take a look at what we find out in the field.
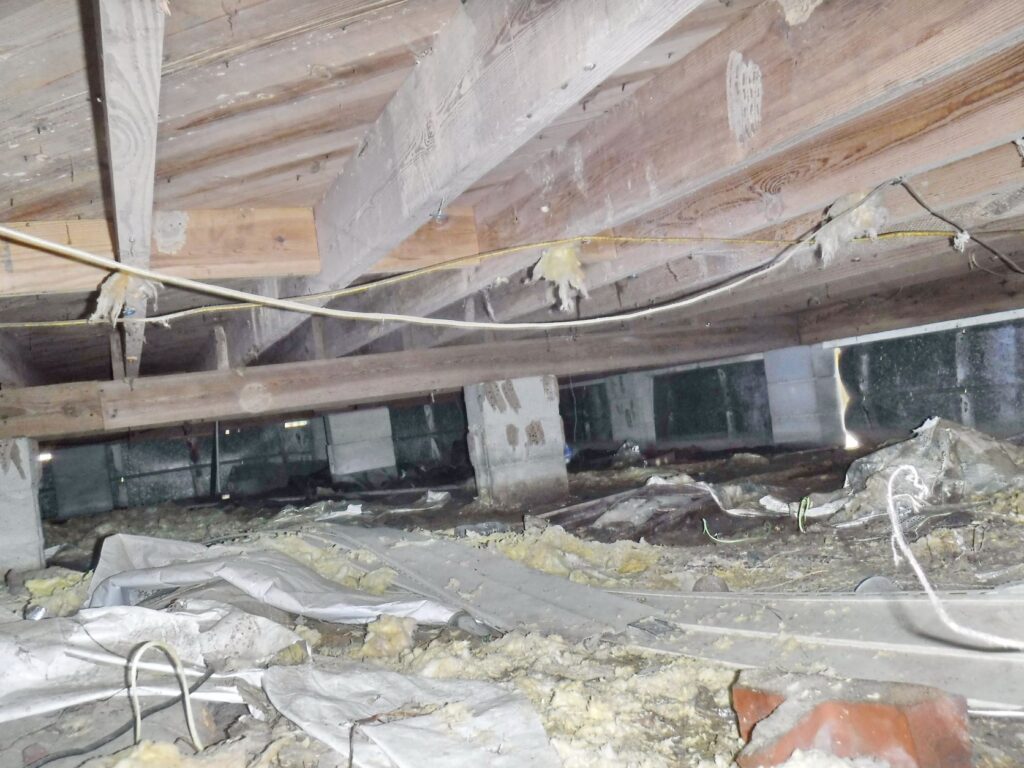
There’s a lot to be desired here. The missing insuation will allow condensation on the subfloor especially if the occupants like it cool in the summer. R-19 is required now. The vapor barrier they have is useless and there is a lot of debris that needs to be removed. There is no ventilation on three sides of this home.
The picture above shows the insulation installed up side down. The paper facing should be facing the warm in winter side of the home. Actually should be pushed up tight against the floor held in place by insulation rods. When the paper is down like this the paper will get wet and moldy. The amazing thing about this is that the instructions are printed on each roll of insulation. Problems with insulation can be gaps, and sagging insulation. Sagging insulation can be a sign of moisture issues. Condensation forms on the bottom of the insulation weighing it down making it fall. Once I observed that someone had stapled plastic under the floor. That is a big no no as it’ll trap moisture rotting the floor out.
Plumbing Issues
Inspectors should note the type of supply and drain lines and their apparent condition. Each type of piping has a long list of possible issues. Improper support, leaks, improper configuration or corrosion are common especially on older homes. If the home has been remodeled chances are some of the drain lines are configured incorrectly. I’ve already written an article about Traps, Trap Arms and Vents at my other site. For now here’s some pretty pictures.
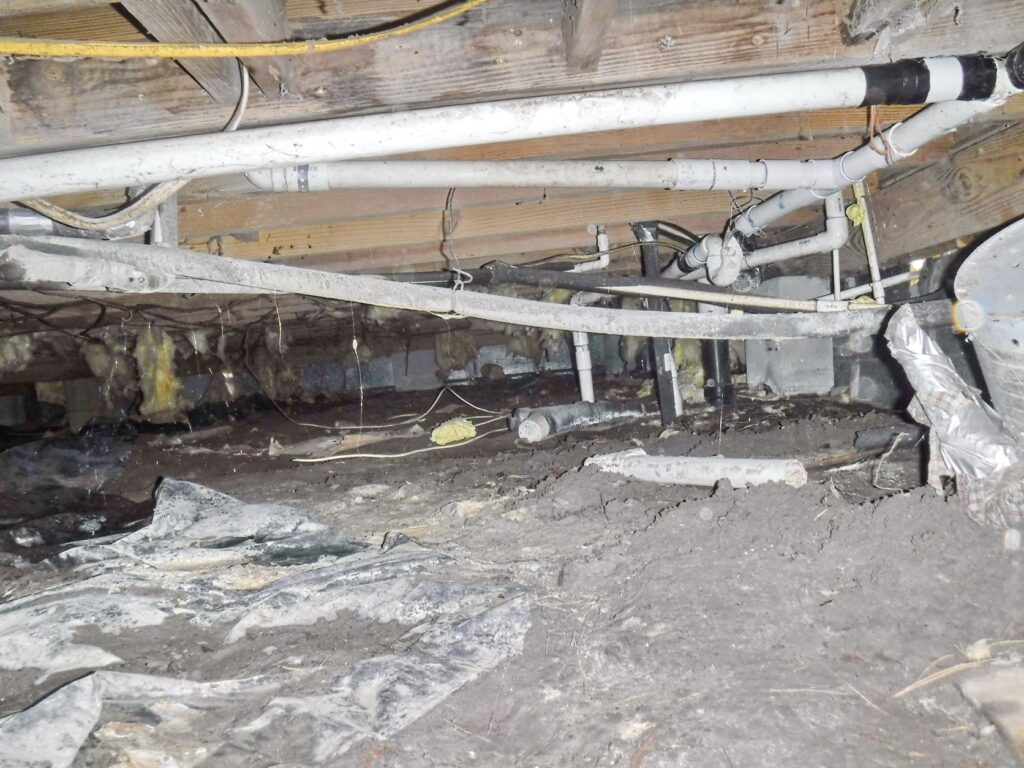
Lots going on in this picture. A running trap, leaks, pipes held together with tape, a tin can used as a clean out cap, improper venting, and lack of directional fittings just to list a few. Also note the damp ground, lack of ventilation and the bunched up plastic.
Electrical Issues
Wiring is located in the crawlspace too. Open junction boxes, Connections made outside of box, improper support, splicing into other circuits and wrong wiring type are common issues.
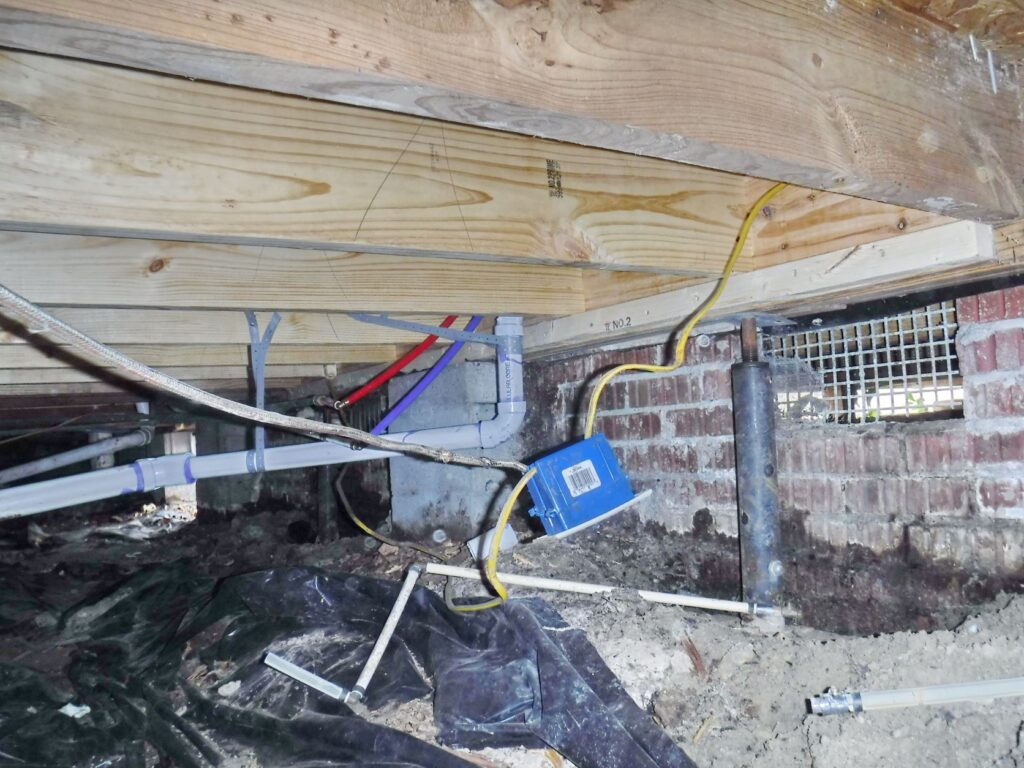
Picture show junction box just hanging there. Electrical junction boxes are required to be secure to framing with the wiring stapled to the framing at the box and every 4 1/2 feet. Just one of the many types of electrical deficiencies we find in crawlspaces. Screw jacks like the one pictured would not be allowed either for permanent use.
Ductwork
Inspectors have to look at the ducts too. Ducts can come loose over time, leaking air. Insulation is often damaged, abraded or wet from condensation. Sometimes animals find their way into a duct and live there.
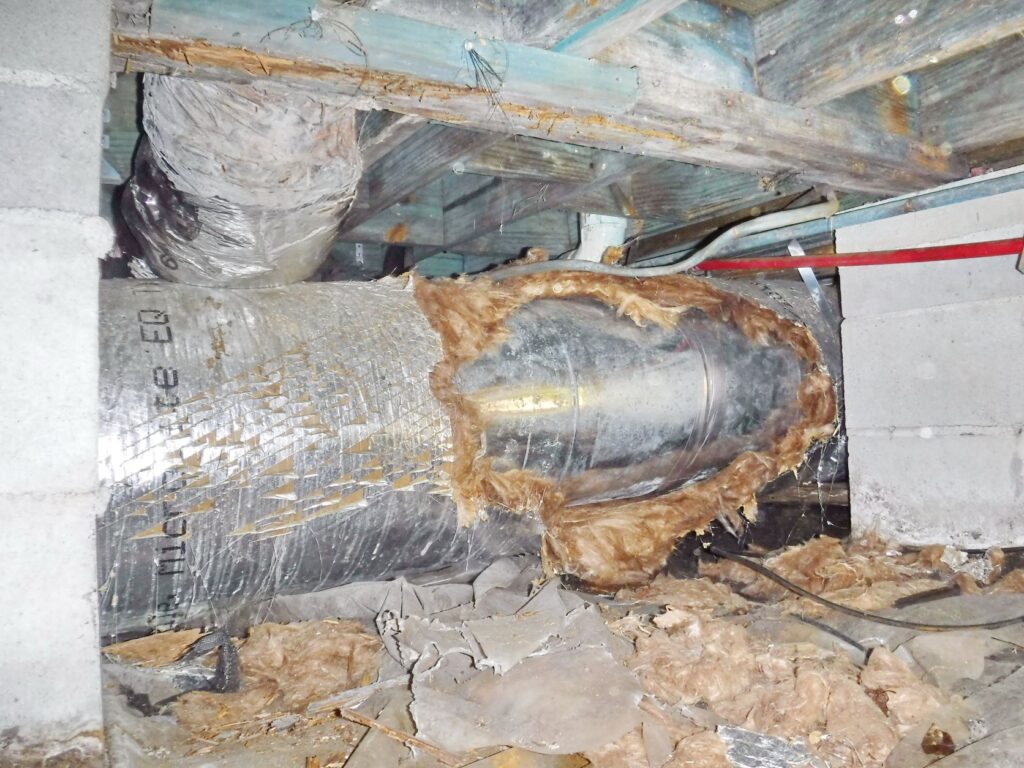
Sometimes ducts in the crawlspace can be in poor condition. They should be at least 4 inches off the ground and fully insulated. Older homes may not have good insulation on the ductwork and it can be wet with condensation. Also large ducts can obstruct access and air flow in the crawlspace. Mold, wood decay is often found on framing near ductwork. Areas of the crawlspace blocked by ductwork often have mold growing because the ducts are restricting the air flow in those areas.
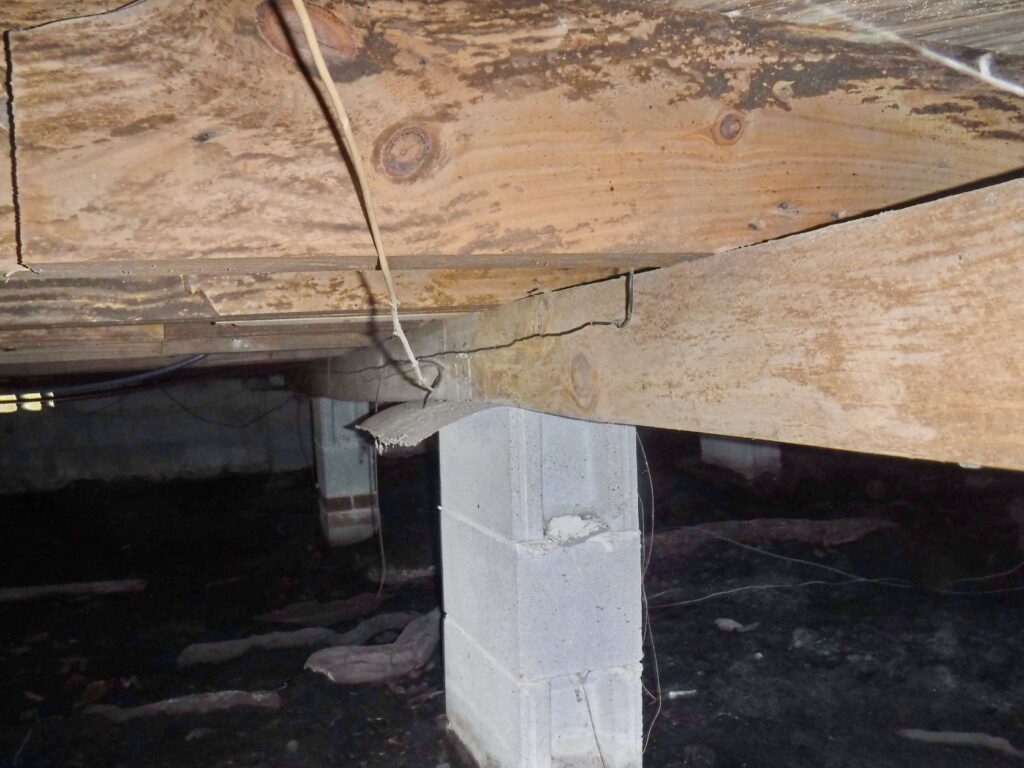
Foundation Walls, Piers, Support
Home inspectors have to look at how everything is supported. Sometimes support just isn’t there like in the picture below.
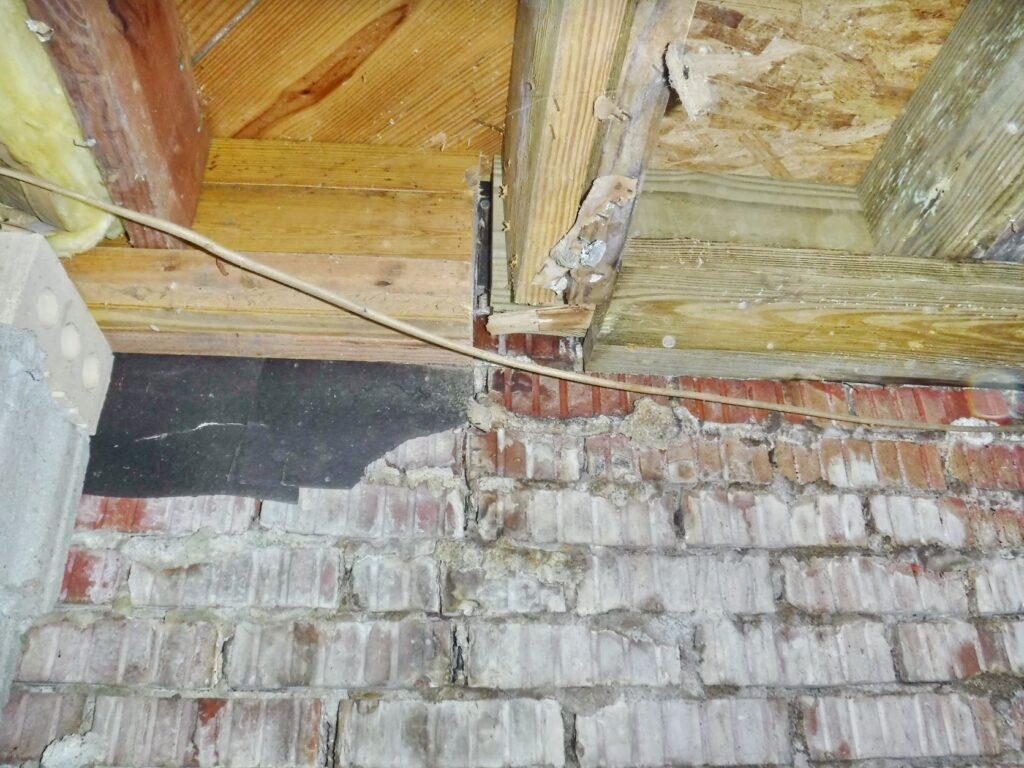
When they made repairs here I guess they forgot to add a pier.
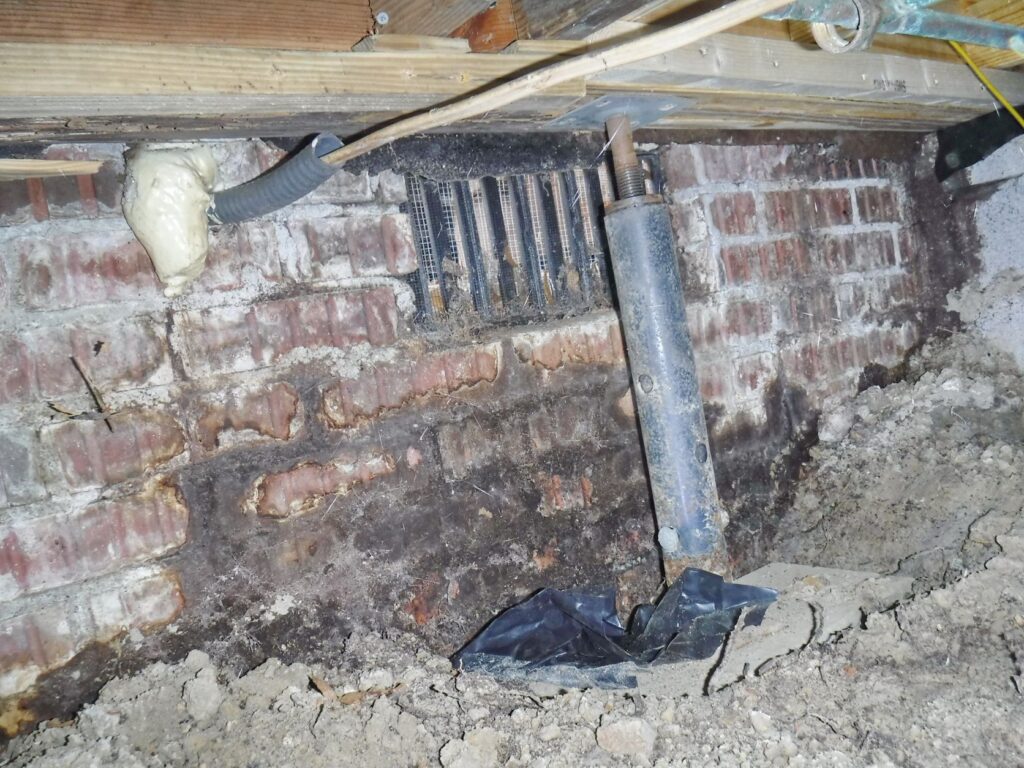
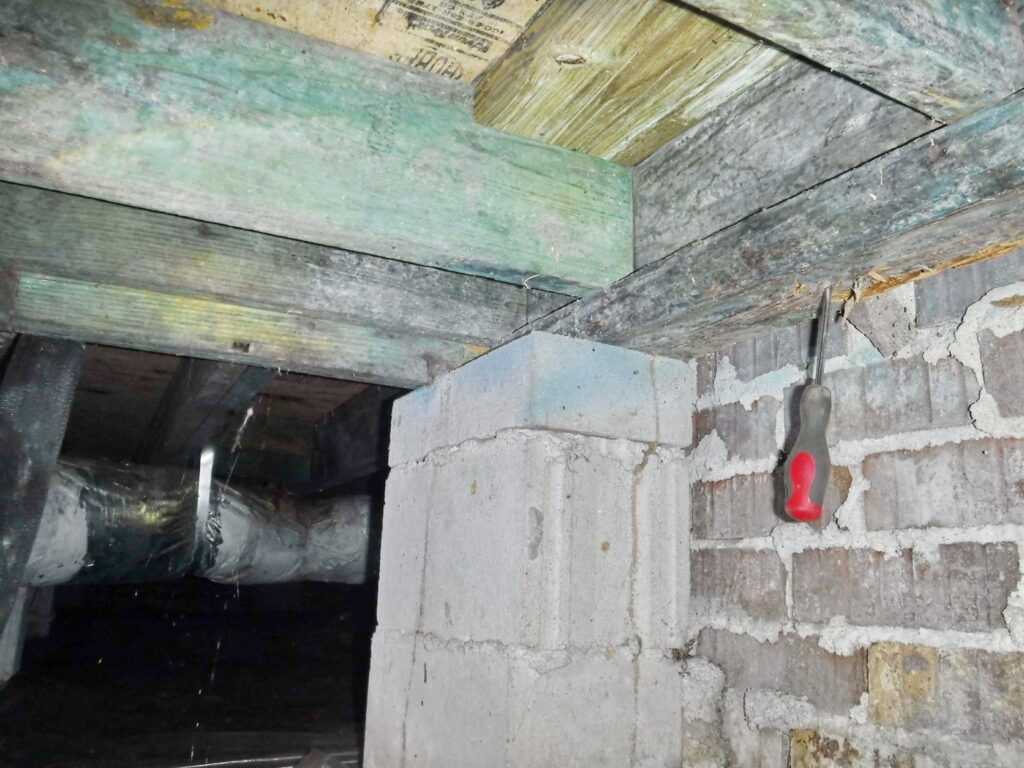
Screw jacks are not allowed for permanent use. This is because the weight of the home would be resting on threads which can rust over time. A steel column is allowed but it must be 3″ minimum in diameter solid, not threaded, painted to withstand rusting and solidly attached at the top and the bottom.
The microbial growth can be seen on these joists and the girder. However notice the girder’s are sagging in the middle. It’s an old house and probably the girder was under sized for the load when it was built. However now we know it needs to be reinforced.
Wood Rot and Decay
Inspectors look for any wood rot from plumbing leaks either past or present. Fungal growth and decay from high moisture levels can structurally weaken the home. The severity can differ significantly from depending on the area of the crawlspace. An inspector that just peeks his head into the hatch could miss something important.
High moisture levels in this crawlspace has caused the floor to rot. Microbial growth can be seen. A termite tracking tube is seen on the concrete block (or what’s left of it). So there has been termite activity on this home sometime in the past. Repairs were made and it looks like the wood was sprayed with a green chemical possibly to treat for fungal growth. However since the moisture issue was never completely solved, decay continues and repairs are needed.
Other Equipment
Inspectors have to look at any other equipment they may have in the crawlspace. Sump pumps, dehumidifiers, HVAC air handlers and sometimes even water heaters. Every type of equipment has specific rules on how they should be installed.
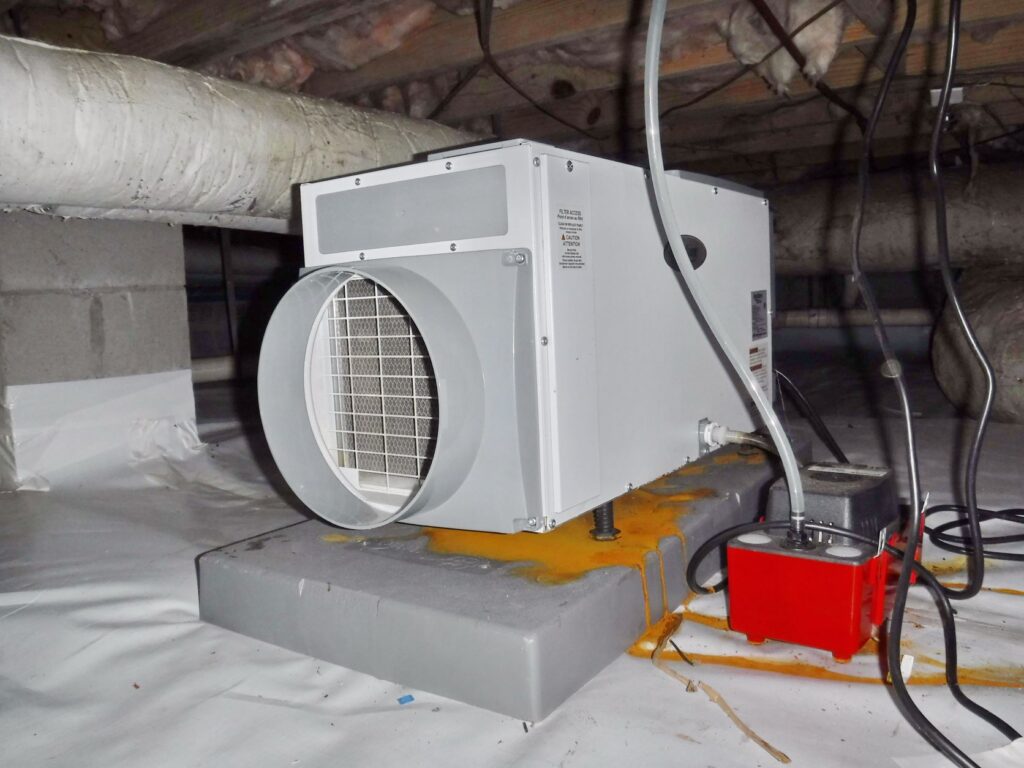
This is a dehumidifier installed for an encapsulated crawlspace system. As you can see the condensate pump is failing and so all the moisture that the dehumidifier should be removing from the crawlspace is being deposited right on top of that nicely applied vapor barrier. This pump had gummed up with algae. This problem will likely reoccur if the setup isn’t changed or regular maintenance performed. Equipment like this really should be suspended from the framing with a pan under it and drain line. The person who owned this home declared he had a perfect home….but the entire bathroom floor was rotted out from a leaky shower pan. This is why a home inspection is important.
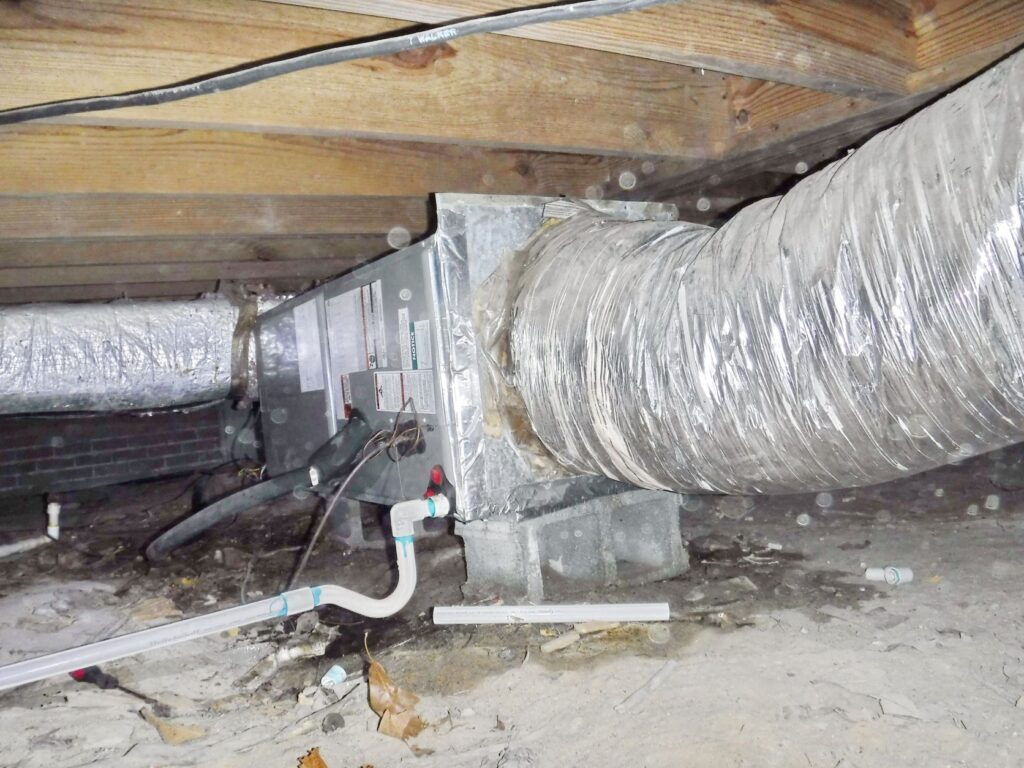
Air handlers can be located in the crawlspace too. There are several issues with this setup however. It should be suspended from the floor framing and not on blocks. The blocks will sink into the ground causing an out of level unit which affects how the condensate drains. There are more than several issues with how the condensate is handled but the main one is that this units condensate line is clogged and has been leaking into the crawlspace for some time. Do you see the wet ground around the unit? The drain line itself (pvc pipe) is short to the outside of the home so all that moisture (even if it wasn’t clogged) is being deposited under the home where it raises the humidity which is not desirable and not allowed. So having a professional HVAC company install stuff for you is not a guarantee that it’ll be done correctly. The people who were buying this house thought it was perfect but the bank required a crawlspace inspection. I discovered this, four leaks and rotted outsider girder from door jamb leaks. This is why it pays to have Blue Palmetto Home Inspection inspect your home.
The Crawlspace Moisture Dilemma
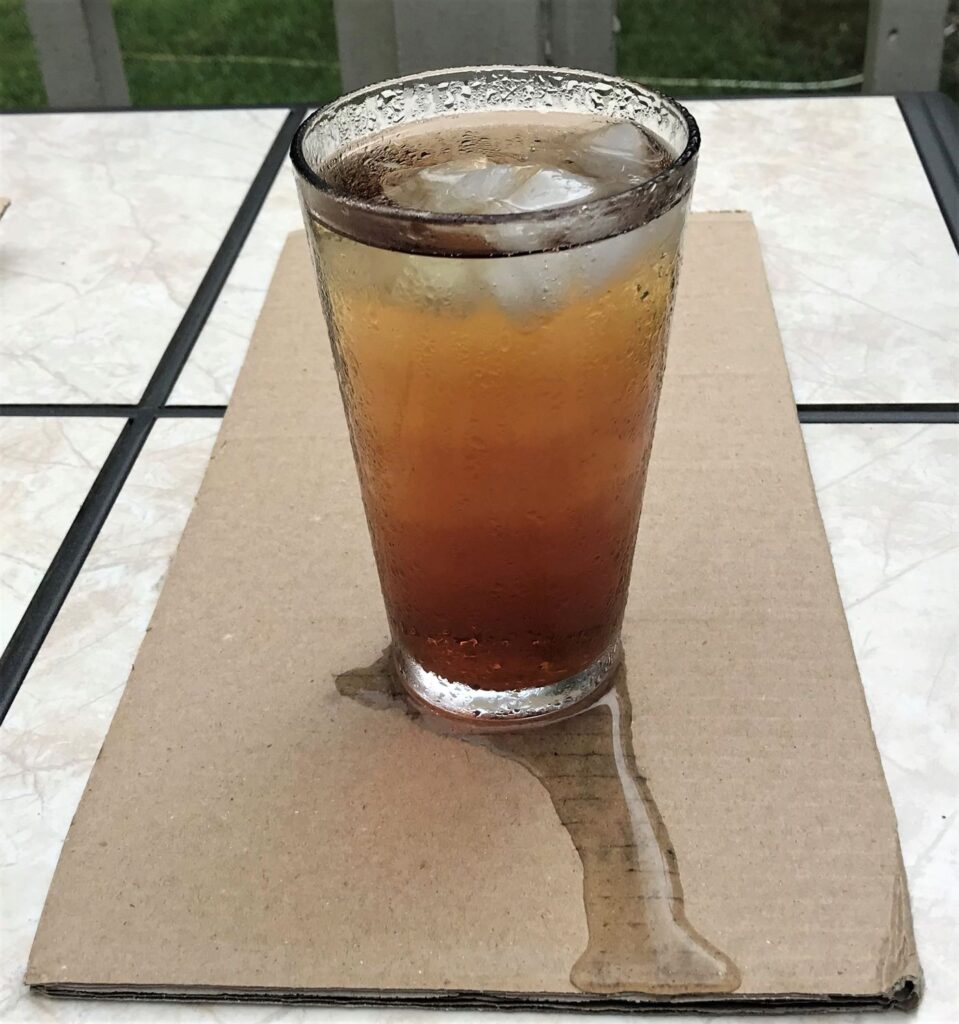
The image above shows how condensation forms on the outside of a nice ice cold glass of tea. Now instead of imagining yourself sitting on your breezy back porch sipping a cold drink I’m going to ask you to imagine something else. Imagine it’s a hot summer day and you come in from mowing the grass outside with your central air conditioning blasting away. Now imagine what’s happening to the subfloor of that old home you bought with no insulation on the subfloor. That’s right it’s getting wet. After a while that wetness is going to translate into microbial growth (mold) and rotten wood. The glass in the picture is outside but it would sweat even if it was brought inside the conditioned house, except not as much. This is why it is still a good idea to insulate the floor even if a dehumidifier is installed in the crawlspace.
So frequently what happens is an older home comes on the market that belonged to an older couple. Despite the fact that this home has stood the test of time a few changes in remodeling or occupancy will sometimes disturb the moisture equation. Maybe the buyer will now make improvements like adding a new AC or installing PVC coated simulated wood floor coverings. The home is sold to a nice young couple who like it “comfortably cool” in the house. This is in contrast to the older folks (like me) who typically don’t turn the AC down quite so low. So while this young couple is enjoying their air conditioned home their subfloor is slowly decaying. The addition of moisture restrictive floor coverings can exacerbate the issue because it prevents the floor from drying out from the inside. I’ve seen the subfloors dripping with condensation from just this scenario. However the solution of the problem depends on more than just turning the AC off. Any possible solution should be tempered with the severity of your particular situation. However if these conditions exist on your home we recommend contacting a professional crawlspace moisture control expert who is experienced and has a good track record of solving these problems.
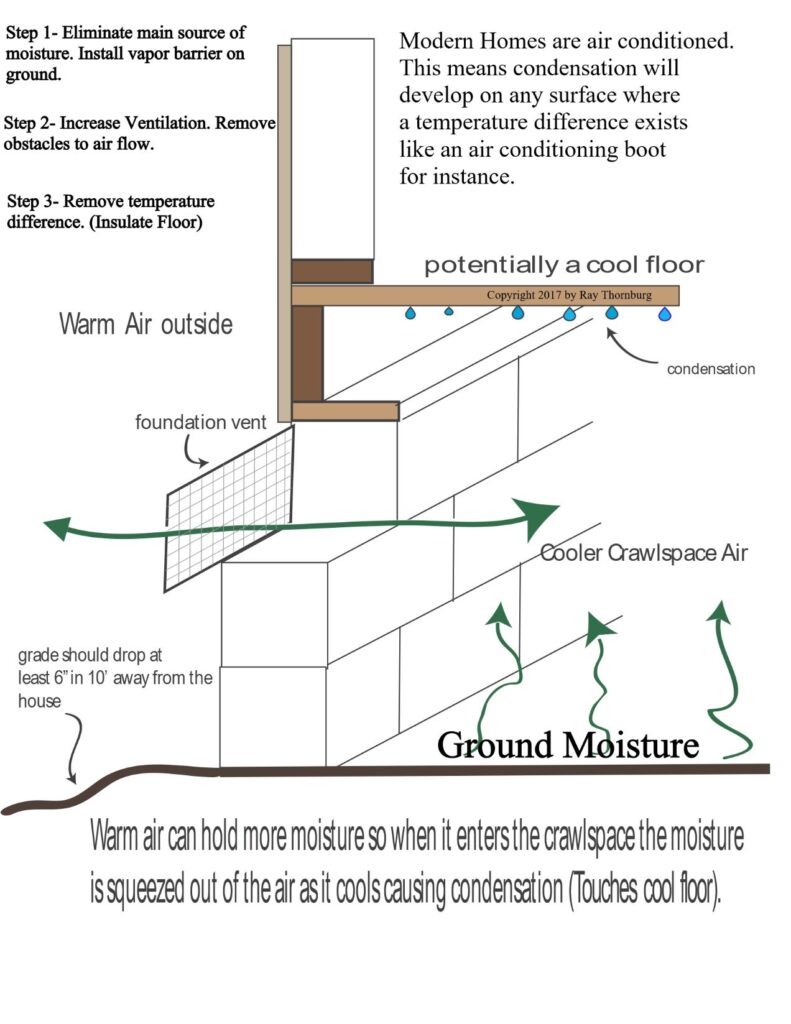
The water table is pretty high around the Charleston SC area and so this increases the amount of moisture coming from the ground into the air. The lower your framing is to the ground the more pronounced the undesirable effect this will have on the wood framing. While the traditionally ventilated crawlspace system is the preferred system if it is working for you. However in some cases an encapsulated system is needed. If you need this type of system be sure to get a professional who is experienced to do the work. It takes special tools, chemicals, knowledge, code considerations that the average tradesman is not familiar with. How you proceed should be based on your particular needs. It might be that all you need is a well applied vapor barrier. Let’s explore these systems below.
A ventilated crawlspace is preferred in most cases because it is maintenance free. However the floor needs to be insulated. The biggest obstacles to this the success of this type of system is….
- Insufficient ventilation. Adding more is better. A lot more.
- Lack of a vapor barrier increases the the humidity in the crawlspace.
- Obstructions to air flow in the crawlspace. Large ducts in the crawlspace can create a “dead air”zone and the ducts close proximity to framing has a tendency to attract condensation on framing.
- Leaks from plumbing deficiencies, dryer vents, or equipment condensate lines improperly routed to the crawlspace.
- Poor grading around and under the home.
- Lack of floor insulation exacerbates the condensation on subfloor.
- The homes general low clearance to the ground (the moisture source).
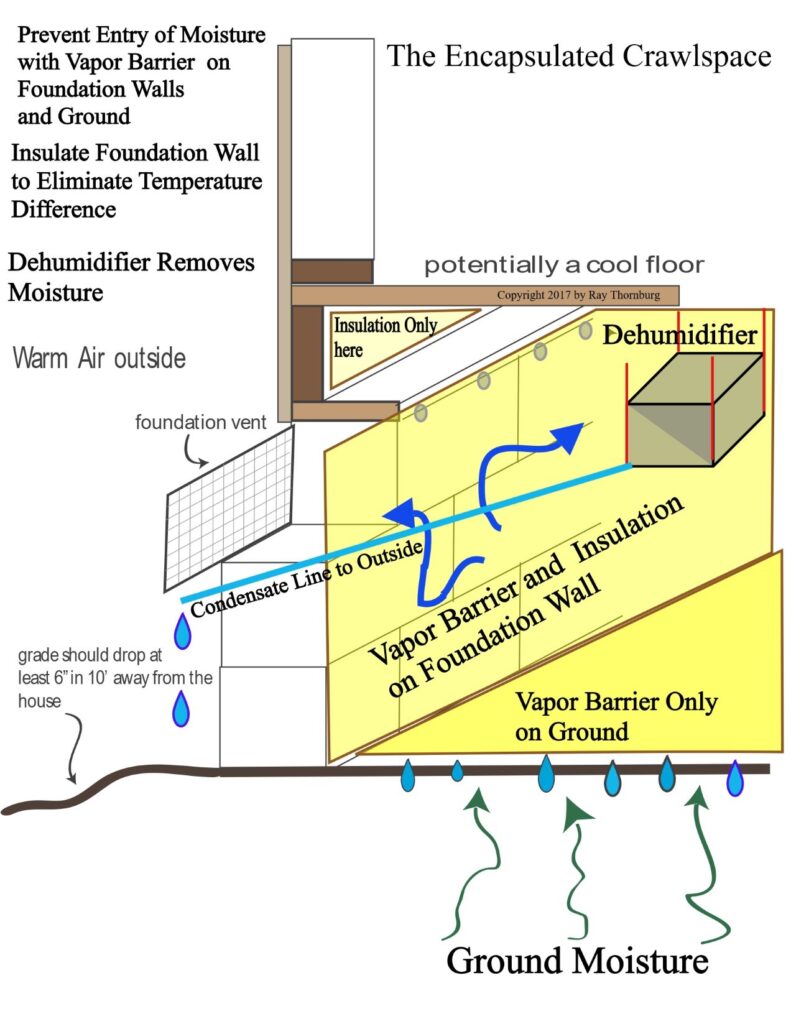
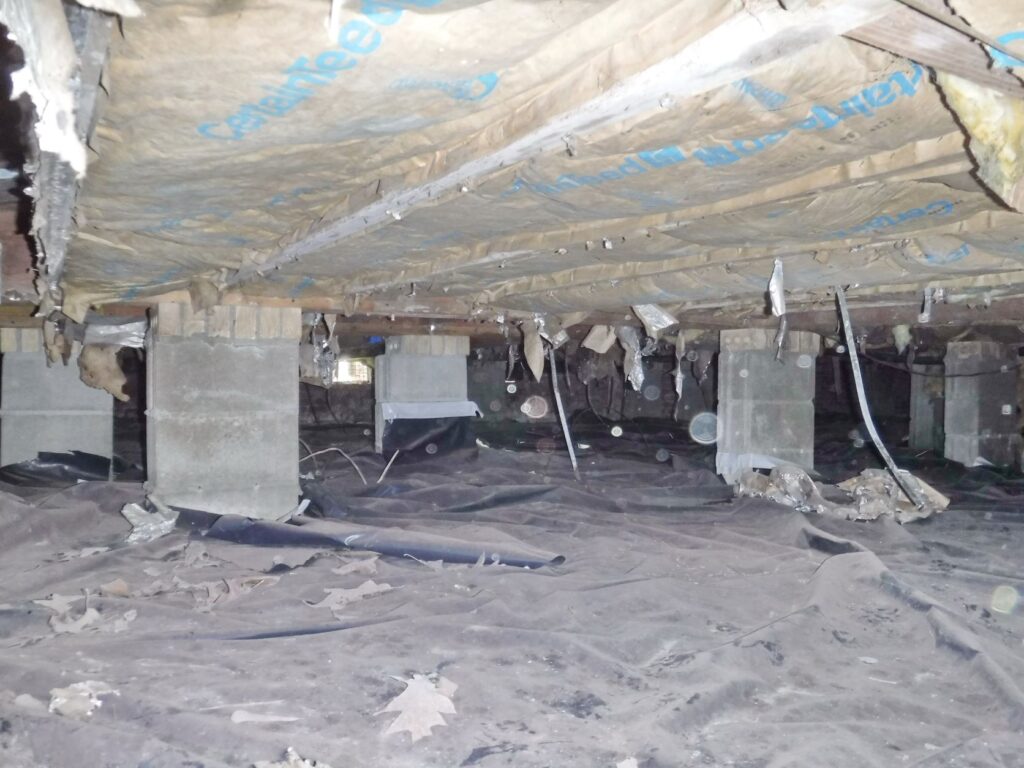
The picture above of an encapsulated crawlspace is just an example. There are some important nuances that was hard to convey in the picture. In most cases floor insulation is still needed on an encapsulated crawlspace system because the outer perimeter foundation wall is rarely insulated correctly. A dehumidifier will be needed and sometimes even a sump pump. The main disadvantage of this system is…
- Cost.
- Maintenance. An electrical failure, or condensate failure could go on for years before the occupants become aware of a problem. Because the equipment is under the home (and out of sight) maintenance like changing the filter or clearing the condensate line is likely to be neglected.
- Original installation of vapor barriers, dehumidifiers may not have been optimal or sized to accommodate a large or segmented crawlspace .
- Dehumidifier not sized for the crawlspace. The area near the dehumidifier is ok but on a large crawlspace the areas farther away can still have mold growing on the joists sometimes.
- The installers of these systems often put the humidity monitor near the dehumidifier which is ok except it’s the areas farthest from the dehumidifier that you should monitor. In these cases the customer has a false sense of security because they’re relying on the wifi humidistat to inform them that the system is operating correctly. If humidistat is close to the dehumidifier then it’ll always show a good reading even when the system has failed or partially failed.
The Manufactured Home Crawlspace
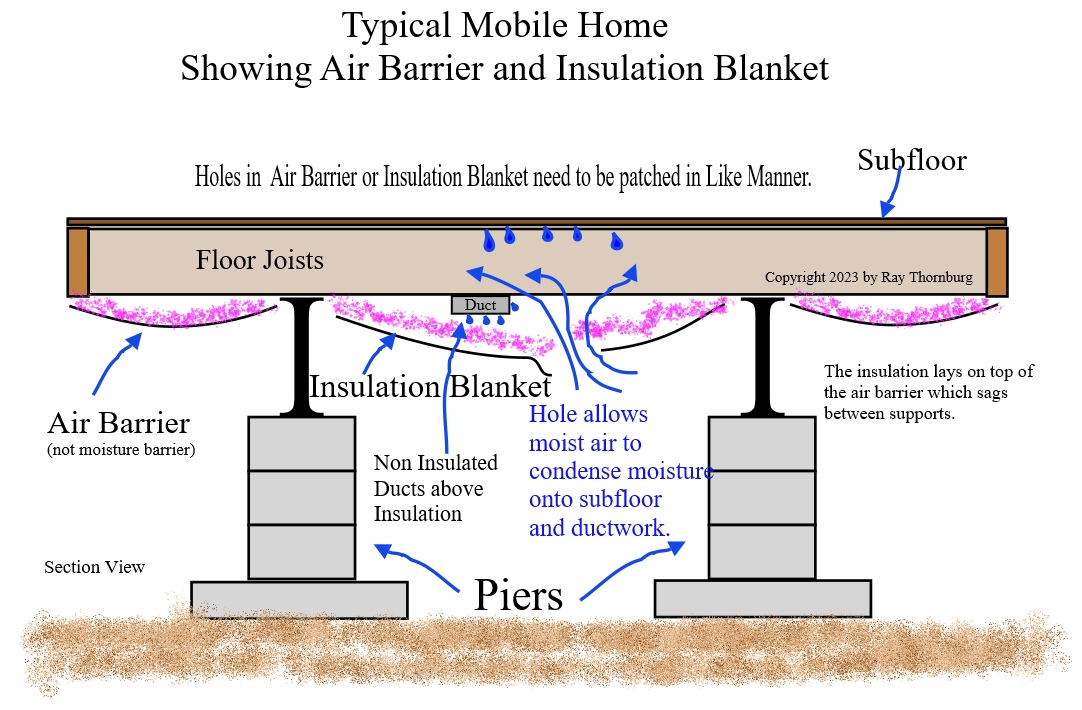
The typical mobile home has an air barrier and an insulation blanket draped under the home. This serves as the thermal barrier on the underside of the home. The good thing about this method is that since condensation forms on the first surface it encounters then crawlspace moisture will form on the bottom of the air barrier first thus protecting the floor framing from excessive moisture. The thing to watch out for is that if any holes exist in the air barrier then that will let warm moist air into the thermal barrier and cause condensation to form on the subfloor etc. in that area. However a breach in the thermal barrier affects the whole underside as warm air enters it’ll travel where it wants. Remember the AC ducts are uninsulated above the thermal barrier. So this can cause condensation on the ductwork too. The other thing to watch out for is critters crawling into any hole and making their home there, and of course causing damage. So any holes in the thermal barrier in a manufactured home must be patched up.
Holes in the air barrier occur whenever workmen have to access an area (to fix a leak or run a cable wire for instance). These holes can be a challenge to patch because most tape doesn’t stick well to the air barrier. Be careful not to use plastic sheeting for this purpose. Plastic sheeting will exacerbate moisture issues on the framing. Use a house wrap type product.
Steps to Improve your crawlspace
- Get professional help especially if you have microbial growth, wood rot, wet ground.
- Lower the moisture in the crawlspace first. No treatment will work to remove mold until the moisture is lowered.
- Remove mold professionally. Simply spraying it with a compound is likely not going to be successful.
- Perform repairs.
- Install vapor barrier or other moisture control devices.
Very well written….thanks for the info….it explains a lot. Now I know how to improve my crawlspace situation.