Building Decks Right

Because decks are often added on sometime after original construction they are not always built in an optimum way. This article will discuss some of the most common deck building mistakes and some possible ways to correct the issues.  Decks should be built to the same standard as the home. If done correctly they should last a long time.

Common Deck Building Mistakes

Cost driven– This is when the avoidance of extra spending drove the decisions to build and design the deck in a substandard way.

Improper Foundation- Although inspectors do not have x ray vision proper pier support is essential to weight distribution and is the fundamental reason for deck sag.

Flashing- Decks should be properly flashed where they are attached to the house. They should be flashed behind and on top with proper flashing, Do not use aluminum with treated wood. Use PVC type so it won’t rust through.  Note* Although a deck next to brick veneer generally doesn’t require flashing the effects of rain water splash back onto brick can be detrimental no framing components over time in some cases.  This is due to brick absorbing and wicking moisture thus raising moisture levels in the nearby wood.  To help prevent this coat the brick with a water repellent coating.  Several products are commercially available for this.

Improper attachment to structure or at structure- If the structure is used to support part of the deck then lag bolts or in some situations special fasteners that cannot be subject to withdrawal should be used.

Attachment to masonry or brick veneer- Attachment to masonry for support has to be part of an engineered design. Brick veneer is not designed to support decks. A lot of people don’t know this but in many cases the brick veneer of a manufactured home doesn’t have a real foundation for the brick skirting. The masons just throw some “mud” in the trench and start laying brick. In these cases the brick is just decorative skirting. So houses and manufactured homes with brick veneer siding or skirting need to be independently supported.

Attachment to Cantilevered Joists– Attachment to the band board of cantilevered joists are prohibited. Most mobile homes have cantilevered joists so in these cases the deck should be independently supported.

Improper fasteners- Treated wood can be corrosive. Deck screws are good for holding the decking to the structure but because shear strength issues they should not be relied upon to attach joist hangers (unless specifically designed) or for structural sections of the deck. Make sure the fastener is designed for decks and is corrosion resistant.

Beams not sufficient- Most of the time load bearing support beams need to be doubled up to carry the weight between supports.

Undersized Joists– We see many decks with joists that either exceed the span rating or are undersized for the application. Sometimes the spacing between joists is excessive for the application.

Improper beam support- Most of the time 50% of the beam thickness needs to be supported by a post. Where sills or girders are used at least 1.5 inches bearing on wood (3″ for concrete) is required. Bolting a girder to the sides of the post without any other support is improper. Where bolts are used like this there should be at least two 1/2″ through bolts per connection.

Age- Sometimes they just get old….You can expect the walking surface deck boards to last about 20-25 years, substructure will last longer so sometime you can breath new life into a old deck by replacing the decking. Handrails get old, fasteners rust, things happen.

Handrails and Guardrails- Sometimes they’re the wrong height or the spacing between pickets is too great. Sometimes they are flimsy. Our stairway requirement page has more information on handrails.

No graspable handrail- Newer codes require a continuous graspable handrail on steps.

Steps substandard- No center stringer, open risers, unequal risers or treads, improper support or sloped treads are among the problems here.

Building deck level with interior finish floor- You can do this…..but it’ll be hard to keep the water out.  It’s best to have a slight step down so water won’t be tempted to slide in under the door.  You wouldn’t believe the damage I’ve seen from this.  There’s also the splash back issue.  Water hitting the deck splashes back onto door jambs and seeps into cracks causing moisture damage.  A small step down helps mitigate this issue.  Check with your local AHJ (authority having jurisdiction) as some municipalities require at least one exit door with no more than a 1.5 inch step down from the threshold.  Although I think this rule (if enforced) is not well considered.

Post size too small- Let’s face it…. 6×6’s are expensive….more expensive than 4×4’s ….and heavy.  Maybe that’s why so many tall decks are built with 4×4’s.  Anything over 8′ needs to be 6×6.  If 4×4’s are used they need to be reinforced every 8′.  

Now let’s take a look at a few pretty pictures I drew up to help clarify some of the issues.

Deck flashing detail example.
Picture show proper way to flash a deck.

 I drew this exploded view to show the proper deck flashing detail.   Notice the three piece flashing is preferred but flashing piece # 3 could be eliminated and # 2 and # 1 could be formed in one piece and it would still work. Flashing # 3 if installed will help keep leaves and debris from forcing its way between the deck ledger and the flashing (it acts as a wedge) compromising connective strength over time.  One trick I used to use is to fill that area between the first decking board and the house with clear silicone.  Not to divert moisture but to keep debris out of that joint. Makes for easier maintenance and a cleaner appearance.  Not shown in the drawing is the house wrap. It is important to note that house wrap is not flashing.  House wrap  serves as an air barrier to improve energy efficiency.  It has a tendency to divert liquid water away from the structure but is actually designed to allow water vapor in the air to pass through to help keep wall cavities dry.  It should be lapped correctly in any case. The picture assumes wood sheathing is used. 

Attaching Deck Ledger to house example.
Ledger and fastener spacing when attaching the ledger board to the house.
Picture shows that a deck attached to brick veneer with no other support is not allowed.
Picture shows that a deck attached to brick veneer siding with no other support is not allowed.
Picture shows that attaching deck to cantilever is not allowed.
Attaching deck to band board of cantilever joists is not allowed.

The picture above shows that supporting a deck by attaching it solely to the band board of cantilever joists is not allowed.  On a mobile home the support is at the I beams and not the outside band board.  The picture shows vinyl skirting but even if it had brick skirting it’s still not allowed.  The brick skirting on a mobile home in most cases is just decorative.  Also the cantilevered joists and band board are not designed to support the additional weight of a deck.  So whether it is houses or mobile homes it’s not safe to  attach a deck only to the band board of cantilevered joists.  Decks should be attached to the structure;  but it also should be independently supported in these cases.

Picture shows that bearing is now required.
Picture shows that bearing is now required for girder attachment to posts.

The picture above shows that attaching a girder to a post using nails only is no longer allowed. This is because over time the board will split at the end fasteners. To solve this issue use a vertical ledger (jack) and properly fasten it. The ledger can go all the way down the post to bearing or it can be shorter depending on the load. Since we see this issue a lot we offer this as a common sense remedy.

Note* We see beams separated like this a lot but it is really much stronger if the beams are nailed together. If you run into a situation like this where the beams are separated consider filling part of it in  (the center in particular) and properly fasten them together.

General Guidelines for Building a Safe Deck

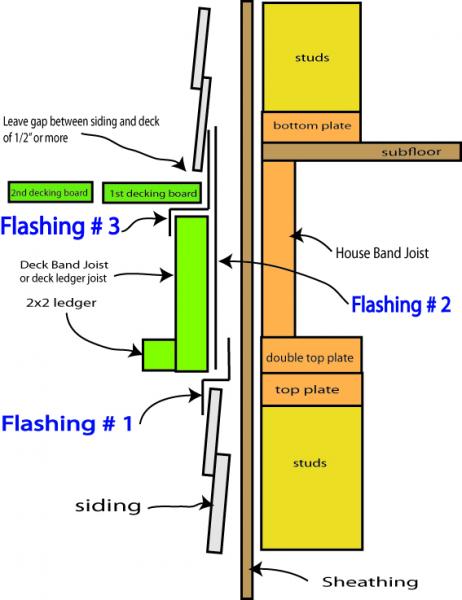
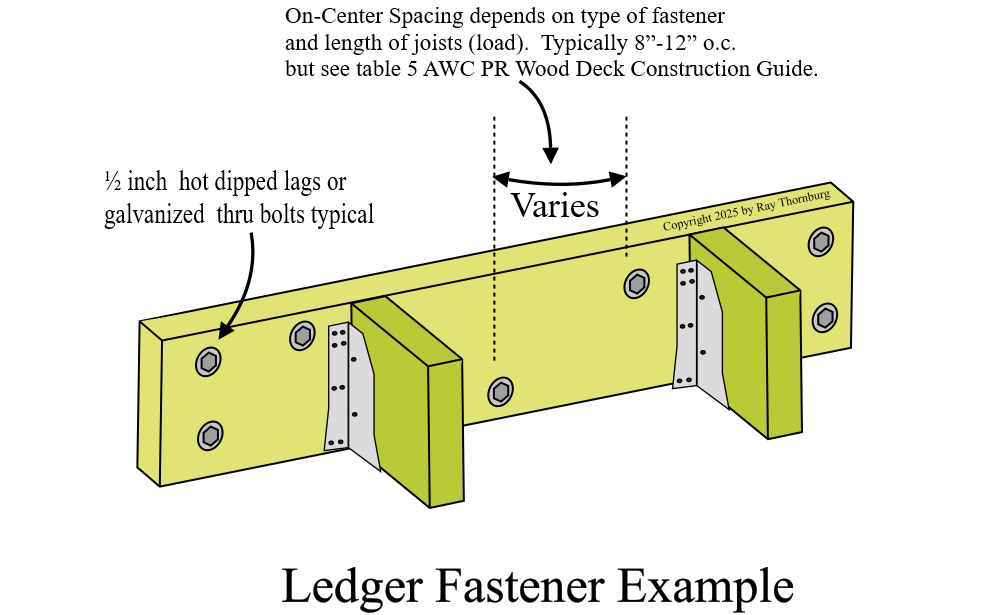
·      Decks need to be positively anchored to the main structure with fasteners like 1/2’” lag screws that cannot back out easily.  This is required even if the deck is independently supported. Siding material should be removed so that the deck ledger can be placed directly against the house.

·      Lags should be staggered and installed 2” from top and bottom of ledger spaced according to the designed load.

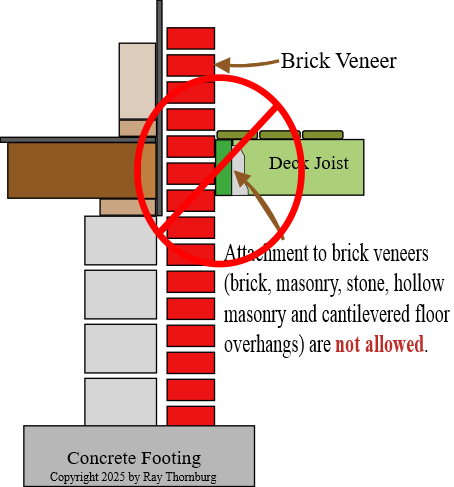
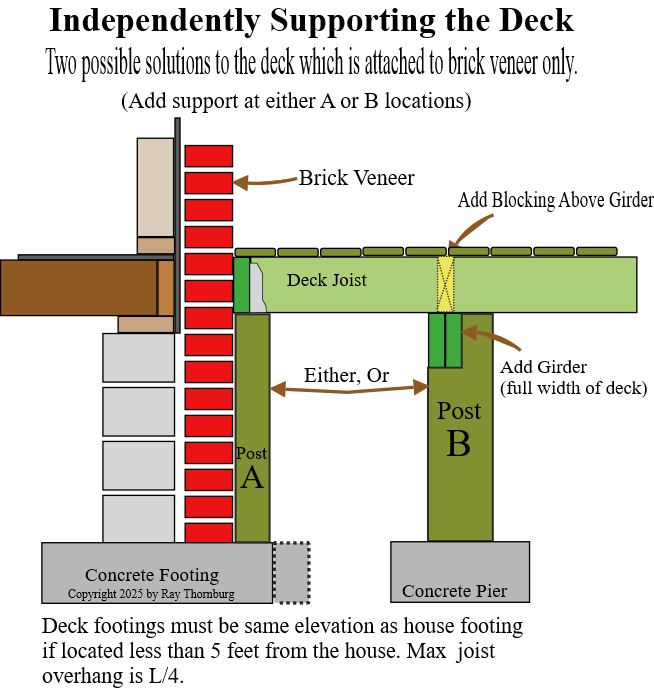
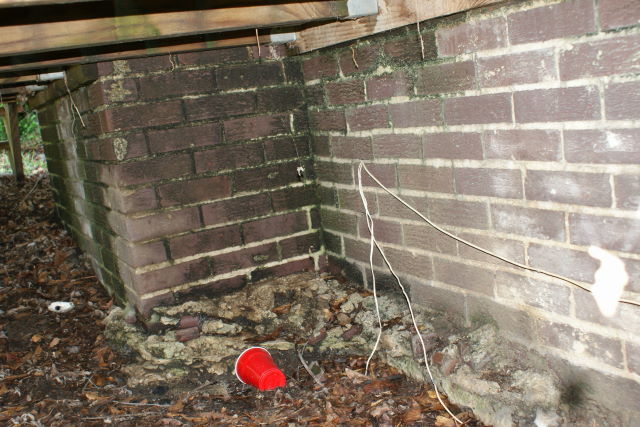
·      Girders supporting other joist should not be supported only on the deck ledger (the ledger is the board that is attached to the home) unless specifically designed. Ledgers shall not be supported by or on stone or brick veneer.

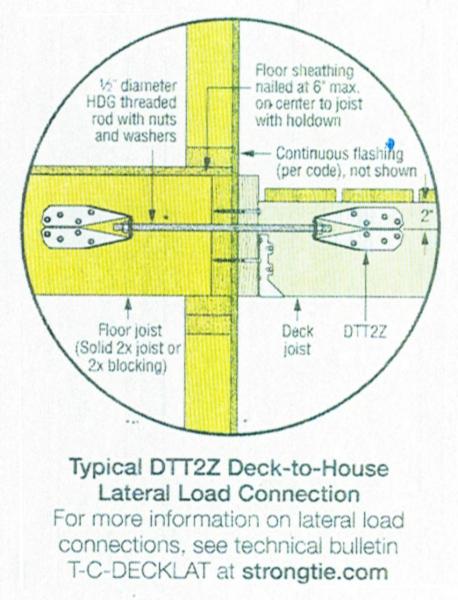
·      Newer codes (2009 and later)  require 2 tension hold down devices per deck. This is a type of device which is attached to the interior floor joist and exterior floor joist and connected by a threaded rod. This will help keep the deck from separating from the structure in case something crazy happens.

·      Bottom of footings or piers need to be at least 12” below ground level, below the frost line and at least four inches bigger all around than the post that sits on it.  Wider piers will support more weight and we like to see it at least 8” thick.  Of course this recommendation will change according to local soil conditions and codes or actual engineered analysis. Must be able to support the load imposed.

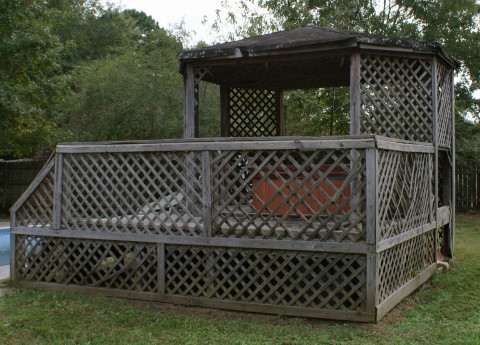
·      Decks need to be designed to support 40 lbs per sq ft live load minimum or more if a special load is imposed (like a hot tub).

·      Columns should be restrained to resist lateral displacement at the bottom end and uplift forces.

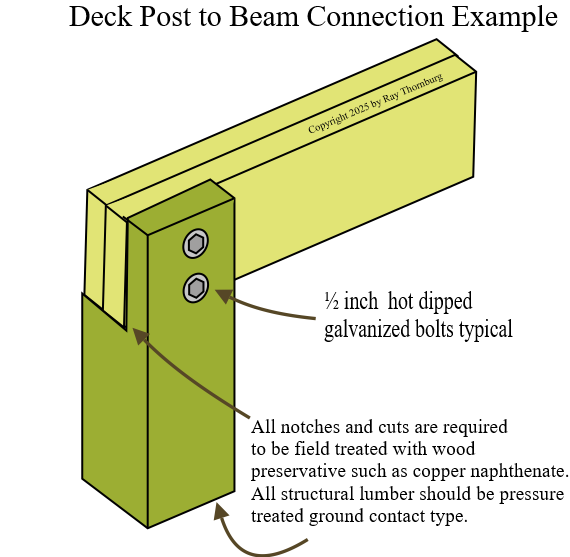
·      Columns should be treated to prevent rot except when they are supported by a metal pedestal 1” above concrete and 6” above the ground.

·      Columns not less than 4×4.

·      Positive connections required to prevent uplift. (i.e. high wind event)

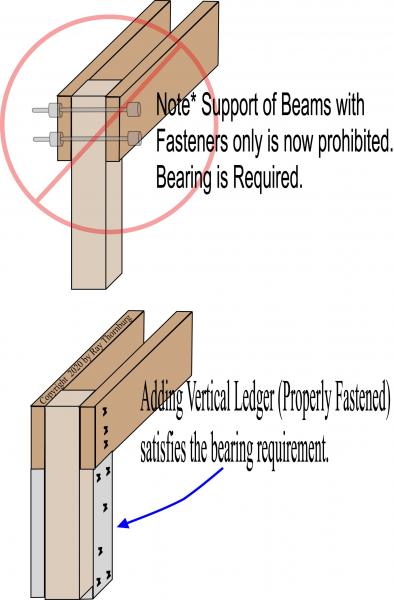
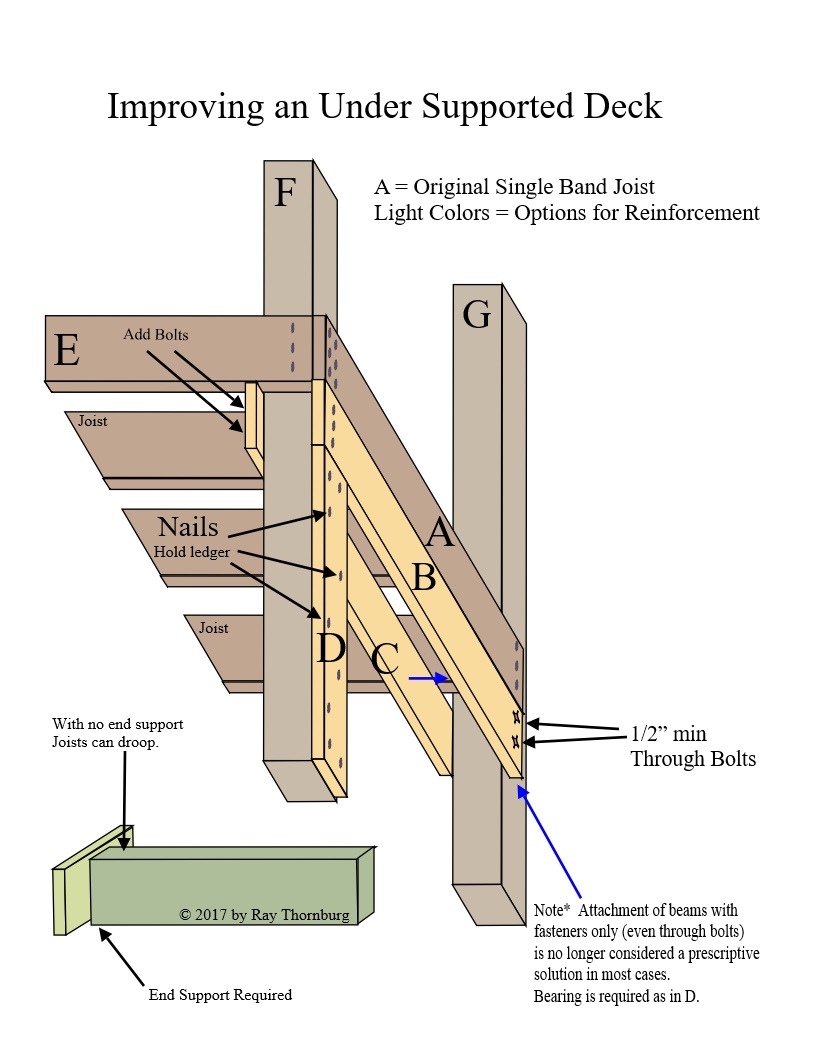
·      The end of each joist, beam or girder shall have at least 1 ½” bearing on wood or metal. They can also bear on 2×2 ledger strips or approved joist hangers.  In certain jurisdictions hangers are favored over the traditional 2×2 supporting method. Close to the ocean stainless steel hangers and other connective hardware, fasteners are required.

·      Joist need to be supported laterally at the ends by blocking or rim joist.

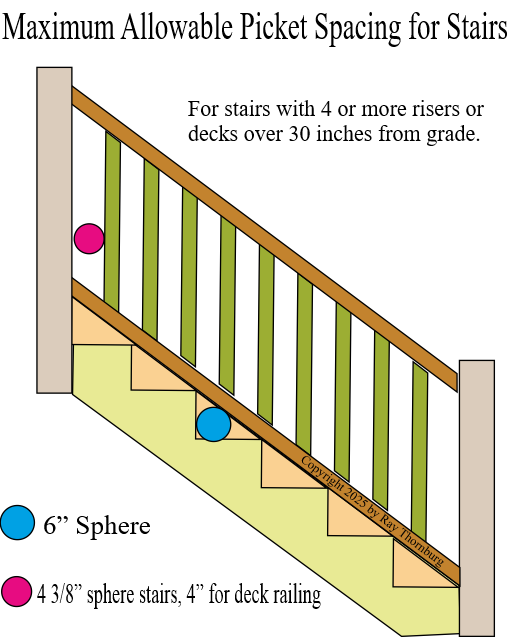
·      Guards (approved handrails) shall be provided for any walking surface more than 30” above grade. Should be at least 36” high.

·      Guards and handrails must not be flimsy. (must resist 200 lb force)

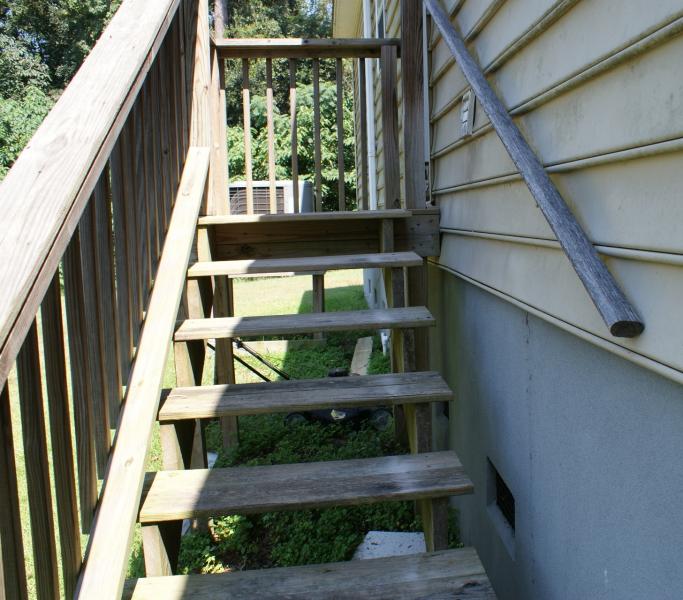
·      Steps must withstand a 300 lb point load on any 4” square.

·      Pickets no more than 4” apart except step pickets which should be 4 3/8” apart.

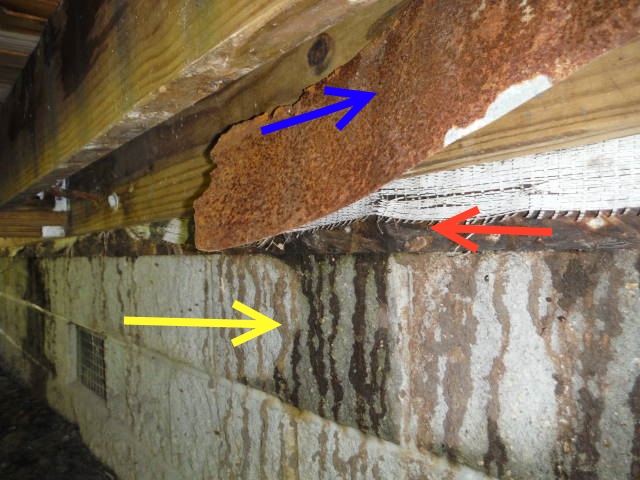
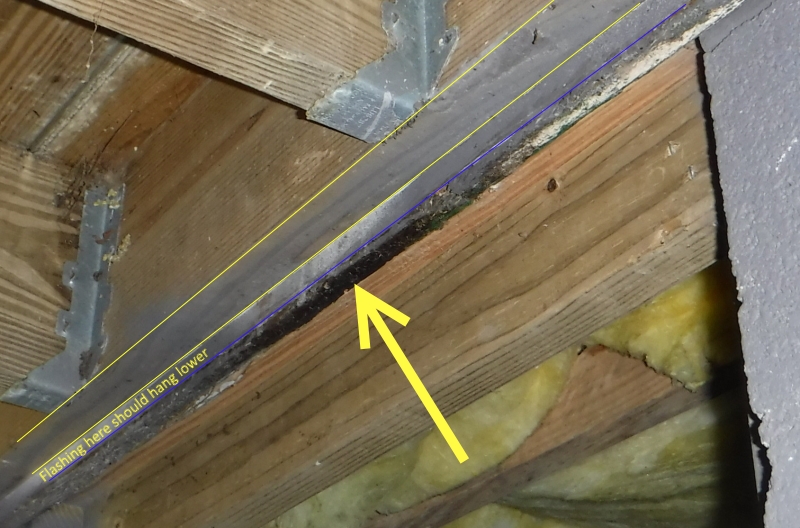
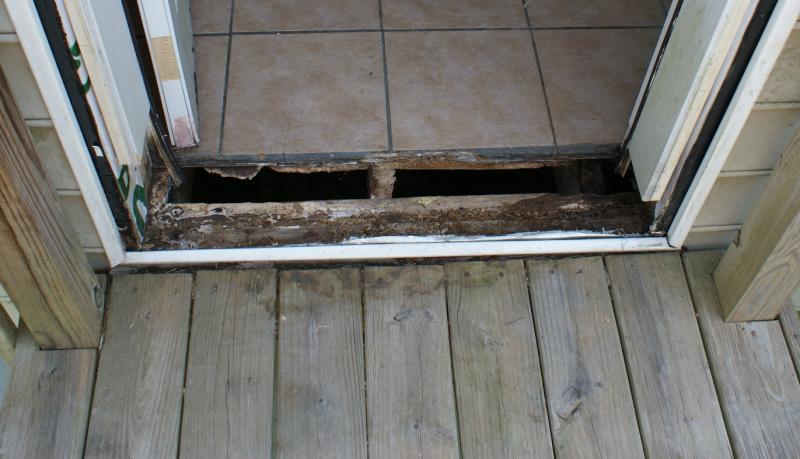
·      Flashing should be above, behind and below the ledger.  Do not use aluminum flashing as it will corrode. Use PVC flashing types with the newer treated wood.

·      Use deck screws or spiral hot dipped galvanized nails on decking walking surface and you won’t get nail pops.

·      Use proper fasteners. Most of the time deck screws are not designed to be used for structural parts like beams and joist hangers because of shear strength issues.  They are hard and brittle and snap under stress. Use joist hanger nails for joist hangers and paslode nails are a good choice for structural parts. They’re a variety of fasteners and hangers available so read the package to make sure it’s the correct ones. Even stainless steel comes in different grades so check for proper application.

In my opinion rang shank fasteners are fine for applications where withdrawal might occur (like decking boards or sheathing) but should be avoided in areas where structural strength is a concern (like nailing beams, joists together). This is based on my observations at the ease in which they can be snapped in half compared with other nail types. I’ve noticed that when a rang shank nail starts to bend,  it often just snaps in half. I’m waiting for engineering proof to catch up with my observations however.

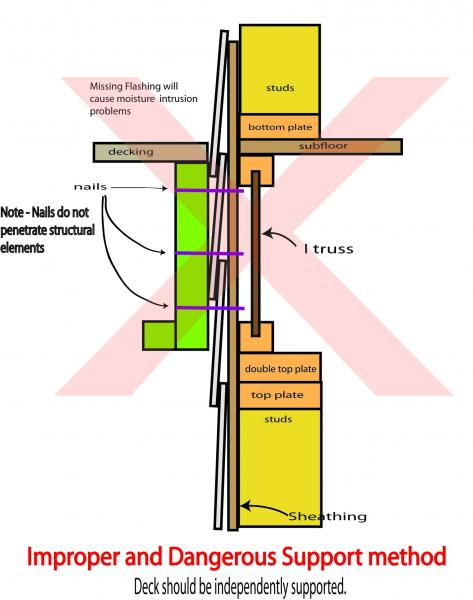
·      Do not attach ledgers to I-trusses or the top 2×4 of web type floor trusses.

·      Space decking boards about 1/8th of an inch to account for swelling and contraction.

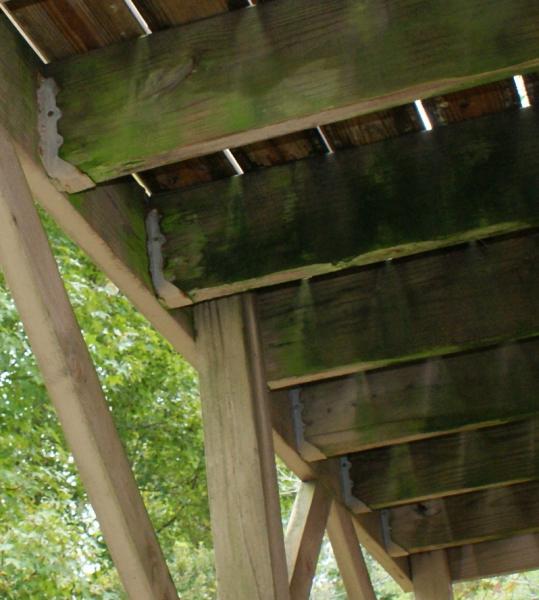
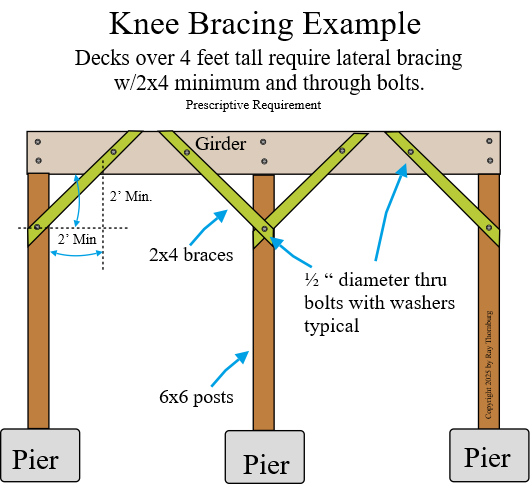
  • Decks  over 4 foot tall should be laterally braced in the outside corners with a diagonal “knee” brace at least 2 foot down and two foot across. For real tall decks X or K bracing might be needed. These type of bracing go from the top of one post to the bottom of the adjacent post for more stability.

Now let’s take a look at a few more pretty pictures.

Picture shows several options for fixing a deck attached to brick veneer.
Picture shows typical post to beam connection example.
Picture shows options to reinforce an old deck.

We see a lot of marginally supported decks; some are built with a single band joist, sometimes with no joist hangers or through bolts.  Decks with single band joists are very likely under supported.  Picture at left shows some options for improvement.  Depending on your situation it may be possible to drop a 2x in under the existing single band joist (B under A). (C) can be added for joist end support on the inside or can be slid over (blue arrow) to double up (B).  A ledger can be added (D) or through bolts used.  If a ledger is used like this it should be at least 24″ long (or it can run the whole length of post to strengthen it too).  The size of (B or C) will depend on the load and the distance between supports.  Some newer prescriptive rules for band board support (like A) do not allow support even with two through bolts so would require a ledger (like D) in the illustration.

Picture shows picket spacing at stairway requirements.

Commentary on Pressure Treated Wood

Wood decay can occur from fungus or termites or other wood destroying organisms.  So it’s required that wood which can resist decay be used outdoors.  Typically this involves using pressure treated wood.  Be advised though that the pressure treated wood available today is not the same as it was years ago. You might be disappointed in it’s performance.  So we recommend field treating ends of posts with a preservative like copper naphththenate. It is also wise to treat decking boards with it (or another wood preservative product) every so often.  The amount of protection of any brushed on protectant is dependent on its penetration so use plenty for best results.  Be sure to use wood rated for ground contacted especially if it’s in or on the ground.  There are tags on the ends of the boards with the rating.

As a personal note many years ago pressure treated wood was really reliable from my personal experience with working with it.  The chemicals they use to treat wood with appear to be less effective now.   I’ve seen lumber, even lumber which is traditionally ground contact rated,  less than ten years old decay from fungus so much as to render it useless.  I have also seen this in treated lumber used above ground which only occasionally receives moisture penetration.  I consider this type of performance so dismal as to rival untreated wood.  As a consumer we are limited by the products available at the local lumber yard so it appears that the days of a worry free exterior wood deck or porch may be a thing of the past.  I imagine that there may be structural collapses caused by this in the near future.  So monitoring is recommended for any exterior deck. Be advised.  As always we welcome any comments about this in the discussion box below.


·      References 2003 IRC 502.2.1, 2006 IRC 502.2.2,2009 IRC 502.2.2.1.1, 2006 IRC 502.2.2.2, IRC R403, 403.1.4. IRC R 407.3. IRC R319.1, IRC 502.9, IRC 502.6, IRC 502.9 Also see the American Wood Council Prescriptive Residential Wood Deck Construction Guide.

Let’s take a look at some more illustrations.

Picture shows an example of improper deck ledger attachment.

Above is a picture of how not to connect a deck to a house.  As you see fasteners of any length would not offer sufficient support here. Even if the siding was removed at this location it would still be insufficient. The same hazard exists when web type trusses are used. In this case the deck should be supported independently of the home.

Example of hold down device used on decks.
Example of hold down device used on decks to secure them to the house. (fair use)

Newer rules require a deck tension hold down device like the one shown at left made by Simpson.  Essentially a threaded rod is used to attach two specially designed ties nailed at 90° angles.  This will keep the deck from pulling away from the house in cases where the attachment was only to the rim joist.  I’m citing fair use to the use of their image for educational purposes.  They make several different types of hold down devices for different application needs.

Now let’s take a look at what we find out in the field.

Picture shows rusted galvanized flashing at deck ledger.

The picture above shows damage from an improper flashing method.  The flashing was bent at a 90 under the deck board.  The salt in the deck board quickly rusted out the galvanized flashing on this 10 year old home (blue arrow).  It allowed moisture penetration (red arrow) thus causing rot and finally termites were attracted to it (yellow arrow).  The yellow arrow shows termite tracking tubes.  The house had to be gutted to fix the termite damage.  The newer types of treated wood has a higher salt content so PVC flashing should be used.  Aluminum or galvanized metal will rust quickly.  Finally the flashing should totally separate the deck from the house and hang down below the sheathing an inch to prevent wicking.  As the picture to the left shows the only separation this deck had was house wrap with is not adequate.

Picture shows flashing at deck ledger was applied improperly.
The picture at left shows how the flashing was flush to the osb sheathing and drip back and wicking is rotting the sheathing at that location. This common deficiency could have been easily avoided simply by dropping the flashing down about an inch.
Picture shows rot at door due to splash-back.
Although this deck is independently supported.... see the posts next to the wall; to avoid lagging it through the wall. That didn't stop the damage though. Splash back caused the damage you see in the photo. Flashing under the door may have prevented this damage. A storm door may have helped also.
Picture shows poor quality deck stair construction.
Obviously a good example of how not to build the steps on a deck. No center stringer, open risers, and a huge gap beside the wall big enough to drive a truck through. They did try to put a grippable handrail up against the wall but it's so close you cant get your fingers around it.
Picture shows deck supported by brick veneer.
There really is no good way to attach a deck to brick veneer. Many times we see decks like this with only cut nails holding the deck to the brick. Cut nails are brittle and not suitable for loads. Recipe for disaster. This deck should be independently supported.
Picture shows improperly supported deck.
Picture shows deck ledger attached through siding materials which is not allowed.

In this picture the deck is improperly supported up against the house by nails only through fiber cement siding.  Further examination revealed that osb I trusses were used in the house floor system.  Let’s do the math- 3″ nail – 1.5″ band joist-1/2″ fiber cement- 1/2 sheathing = 1/2″ left over which in this case has penetrated into nothing but an air space.  Fiber cement siding offers no structural support.  This deck should be independently supported.

Picture shows lattice used as guards on deck.
Here is an old gazebo built in a Charleston backyard. This is a good example of why lattice shouldn't be used as a handrail - guard. It's flimsy, and doesn't age well. Guards have to be able to withstand a 200 lb force. Looks like this deck has seen better days.
Picture show deck needing repairs.
In this picture we see a lot of good intentions but it misses the mark. Single band joist attached to side of post with no only one through bolt into undersized post. The angle braces do help a little to transfer the load but isn't a substitute proper design. All is not lost though there are several inexpensive ways to fix this which would satisfy the intent of the code.
Deck knee bracing example.
Decks over 4 fee require lateral bracing. Example of knee bracing shown.

This article written by Ray Thornburg (not AI).

Blue Palmetto Home Inspection Serves Summerville, Goose Creek, Moncks Corner in SC and Surrounding Areas! Call us today! 843-934-3045

Leave a Comment

Your email address will not be published. Required fields are marked *

Call us now