About Bottom Chord Truss Bracing

Spread the love

     In this discussion we’ll talk about the proper way to brace trusses and we’ll try to confine our talk to the proper way to brace the bottom chord and some of the problems associated with not following correct procedures during the building process.  The truss design drawings (TDD) and the plans for your particular structure have the final word on how this is to be done.  From what I see out in the field there are some misconceptions about this so we’ll try clarify the confusion.  Study the drawing below.

Drawing of bottom chord truss bracing requirements.
Drawing of typical bottom chord truss bracing requirements.

Why We Need Truss Bracing

Permanent lateral bracing is important because:

  • Helps maintain  proper truss spacing.
  • Prevents out of plane truss buckling, rotation or failure of truss members.
  • It resists and transfers lateral loads from wind and seismic forces.

Where we need Truss Bracing

Trusses require permanent bracing within all of the following planes:

  • Top chord plane.
  • Bottom chord plane.
  • Web member plane.

Two types of bracing-

  • Temporary (used to safely erect the trusses).  Temporary braces can become permanent braces if left in place.
  • Permanent Bracing.

How to Brace Trusses

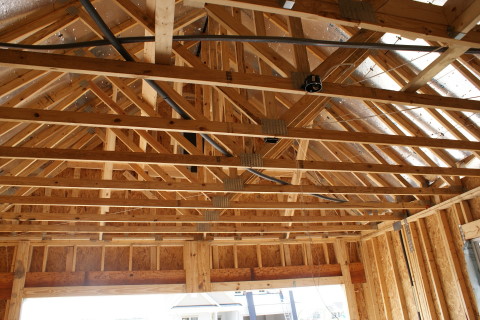
Top Chord Permanent Bracing-  The top chord can be braced by sheathing it with plywood or OSB panels.  Also rows of structural wood or metal perlins that are properly attached to each truss and braced properly.  Plywood or OSB panels must be nailed according to standards.  However the top chord may need to be braced temporarily before the sheathing is installed to prevent lateral displacement. Similar to the way the bottom chord is to be braced,  temporarily.

Bottom Chord Permanent Bracing- Use rows of continuous lateral restraint with diagonal bracing.  Typically these are 2×4’s lapped at least 2 foot and nailed with 2 – 10D, 12D or 16D nails per truss.  Also plywood, OSB panels installed on the ceiling is acceptable.  Gypsum board can also be used  if the edges are solidly blocked with 2×6’s. Reference (IRC 2012,  702.3.7)

Trusses must be braced according to the design drawing, the Truss Design Drawings (TDD) and the BCSI (Building Component Safety Information) which is included by reference in the TDD.  The truss company sends a packet out with every truss delivery with a BCSI-103 Summary Sheet which explains how to brace the trusses in general. The TDD will show where all the other truss braces need to be located.  There may be additional bracing required depending on the wind zone and seismic zone.

Summary-

As you can see there are two types of truss bracing- temporary and permanent. Temporary bracing is designed to help the carpenter install the trusses and sometimes it is removed or it can become permanent if needed. Permanent bracing is required to be there. The Wood Council of America and the Truss Plate Institute (IRC referenced standard) publish the BCSI-103 ( building component safety information) which gives us good practice guidelines and is my first reference.

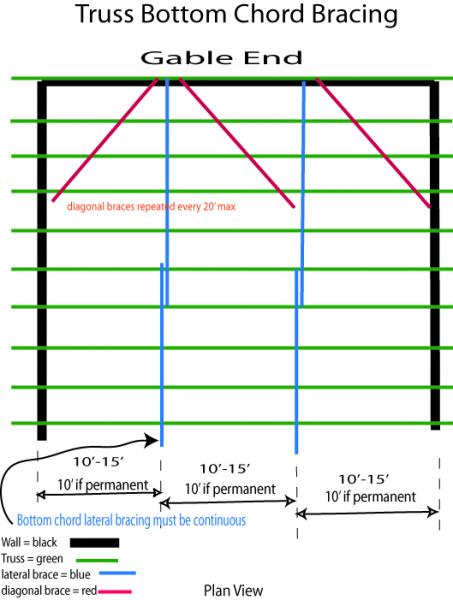
Step 7 page 42 “Bottom chord TEMPORARY lateral bracing must be continuous and installed at no more than 15′ on center and may only be removed (if desired) after the permanent ceiling diaphragm is in place.”  

Since properly nailed gypsum wallboard is allowed as a ceiling diaphragm ( ibc 2508.5)(irc 702.3.7) if the (perimeter edges are blocked) it would appear that the temporary bracing can only be removed after the drywall is finished.  Since in residential construction the perimeter edges of drywall is typically not solidly blocked it is necessary for the permanent braces to be installed before drywall is installed.  The next statement from page 42 states ” Bottom chord PERMANENT lateral bracing must be installed at no more than 10′ on center  (but may be less if required by the specific truss design and/or the building designer), Temporary lateral bracing may be installed at the required locations of the permanent lateral bracing (see TDD for locations) and remain to become part of the permanent bracing system.”

So now we see that regardless of any additional requirements PERMANENT lateral bracing is needed every 10′ and needs to be continuous (across all the trusses). The temporary diagonal bracing may become permanent. (Because it is hard to remove after the ceiling diaphragm is in place.) 

These bracing requirements are for the safety of the workers, the protection of truss components and the structural integrity of the finished product and quality workmanship.

Understand that most of the Charleston lowcountry is in a high wind region. This means that additional bracing is required.  For instance the WCFM 120 mph manual calls for continuous lateral bracing at 6′ intervals on gable ends. The prescriptive methods for bracing in high wind zones is found in the Wood Frame Construction Manual. You will want to know the wind zone for your particular jurisdiction.  It would be fair to say most of the Charleston lowcountry is in the 120 – 130 mph wind zone and those requirements are typically included in the building plans.

Picture of typical bottom chord truss bracing.
Picture of typical bottom chord truss bracing requirements from the BCSI manual (fair use)

Now Let’s take a look at what we find out in the field.

Picture of wall bracing during framing.
Picture above shows how walls are straightened and braced using a string line. They must be held in place until trusses or roofing components are finished so the walls remain plumb and true.
Picture shows a diagonal brace for roof trusses.
Above you can see that the diagonal truss brace pictured helps hold the wall true should the lower brace be disturbed. If the proper truss bracing is not in place before the wall bracing is removed then the walls can shift out of plumb.

Increasingly I am seeing lots of high wind gable bracing which is great; however the continuous bottom chord truss brace is noted absent. Frequently this results in shifting walls which must be fixed later. Study these pics.

Picture shows trusses with missing bracing on the bottom chord.
Here's an attic without any bottom chord bracing. It's hard to even walk trusses like this because they are so wobbly. I drew the lines in where some braces should be. It's actually quite dangerous for the workmen to work on trusses which were never adequately braced.
Picture shows bracing is missing from the bottom chord of these trusses.
Picture shows garage trusses with no bracing on the bottom chord of the trusses.

Here is a garage with no bottom chord bracing. So why would anyone not put the braces in place especially considering how dangerous it is to walk on improperly braced trusses. In my experience many builders starve the framers for wood to economize the job or it may be the mistaken belief that the sheetrock will sufficiently brace the ceiling. Whatever the reason we now know the right way to do it. As we discovered from above if we see a ceiling without the permanent lateral bracing on at least 10′ intervals it is wrong and should be corrected before the sheetrock is installed.

Picture shows out of plumb wall.
Here is what happens when proper bracing procedures are not followed..... photo shows wall about 3/4" -1" out of plumb. The walls shifted because bottom chord truss bracing was not installed when the temporary wall bracing was removed. Easier to do it right the first time.

Learn more about traditional attic bracing at our Attic Bracing article about this subject

Blue Palmetto Home Inspection Serves Summerville, Goose Creek,  Moncks Corner SC and surrounding areas.

Leave a Comment

Your email address will not be published. Required fields are marked *

Call us now