We’ll begin our discussion by reminding everyone that carpenters have been splicing wood together for thousands of years. It’s one of the things carpenters do best but still there are those who say that this is the purview of an engineer and no one else. Headers, jacks, sills, beams, girders rafters, are all spliced together in one way or another. The fact is that there are many things carpenters do that are allowed because we all know they work. This is called prescriptive solutions. Of course we’re talking about splicing a joist or rafter as part of a repair technique for a rotted, termite damaged or over spanned joist. Sometime we just need a longer piece of wood (like a hip king rafter).
Whatever the reason the secret to a good splice is the connection method and good workmanship. The connection method has to be so good that the separate units will act as one; unless a whole unit is substituted or “sistered up”. This discussion is not intended to give credence to any particular splicing project and can not substitute for proper engineering analysis but is only intended to help guide carpenters as to the proper concepts and best practices for proper splicing procedures. Every project is different and has their own particular load bearing criteria which may necessitate different methods, additional support or even engineering analysis. Comments to this blog is encouraged.
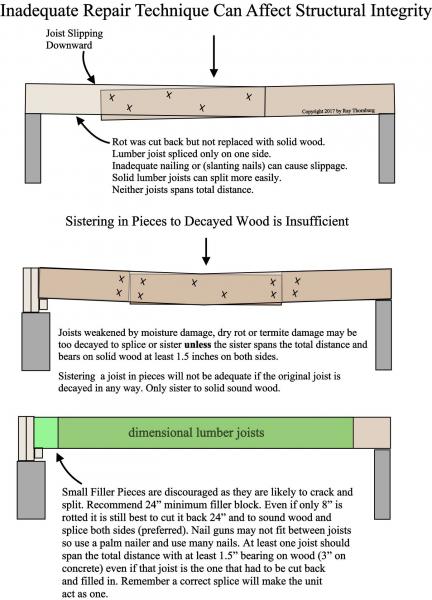
Inadequate repair technique can affect structural integrity.
In the picture above is a diagram of some inappropriate repair techniques. Crawlspaces can be tight and uncomfortable to work in so the temptation for shortcuts and substandard workmanship is common. Lack of experience plays a part. Supervisors are often reluctant to review their employees work. Whatever the reason substandard repairs can be structurally deficient. Most common causes is lack of proper nailing technique and splicing to compromised wood.
The most common way joists are repaired is to “sister” it up. Essentially sliding a whole member beside it and nail the heck out of it from both sides with a lot of nails). If the new sister bears on wood at least 1.5” on each end then you’re good to go. The most common “mistakes” in this method would be not nailing the sisters together good enough, inadequate bearing on one side or another. Another common mistake is slanting the fasteners. Nails must be driven straight (perpendicular) to the joist. A nail gun might be too big to fit between the joists and so will force the workman to slant the nails. A palm nailer works well in this situation.
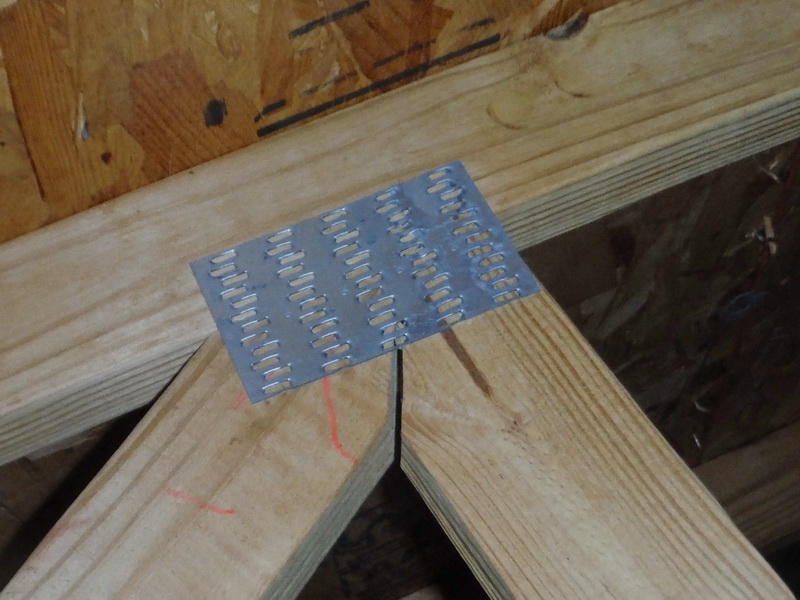
Example of "gangnail" truss plate on a manufactured truss.
The truss companies use a “gang-nail” to splice wood together (pictured at left). A gang-nail is basically a thin piece of metal stamped out so that many metal tangs stick out into the wood about a 1/2” or so. It is stamped into the wood at the factory with a hydraulic press.
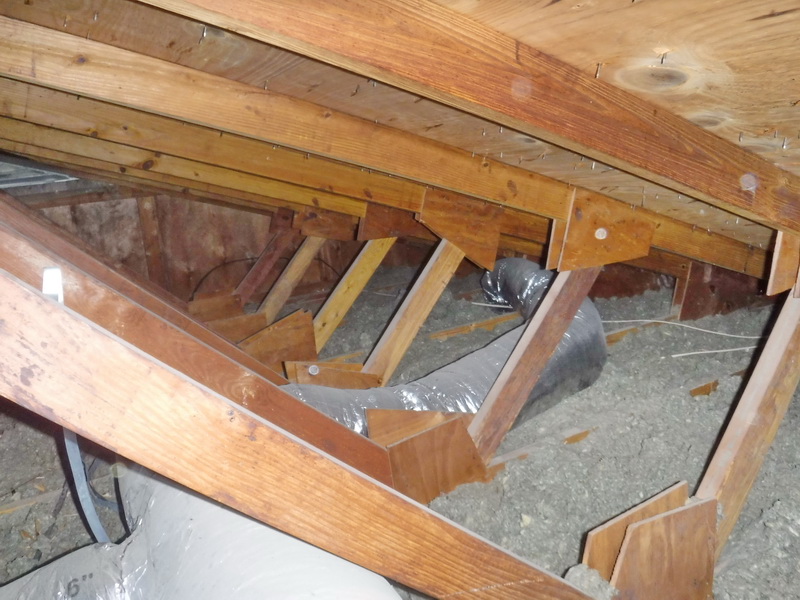
Plywood can be used to accomplish the same thing and for many years many carpenters made their own job built trusses using plywood as the gusset. This practice fell by the wayside mostly because manufactured trusses came down in price. Also contractors could not be sure their workers were experienced enough to do this properly and so opted for engineered wood for liability reasons.
Job made trusses with plywood gussets used as the "gangnail".
Job made trusses in the picture above in a home built in the early ’80’s. Performing as intended.
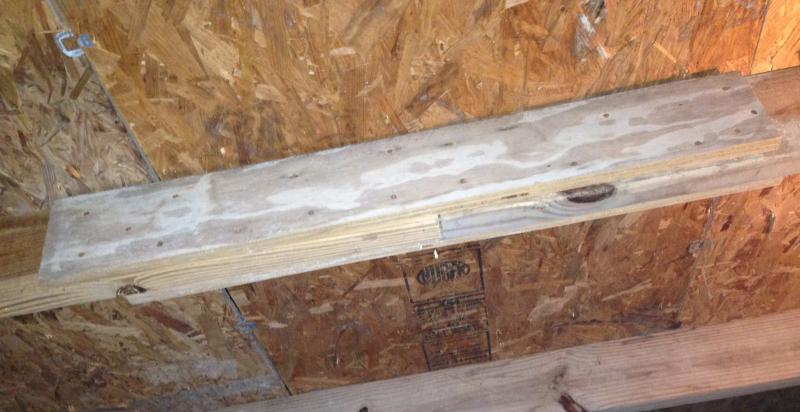
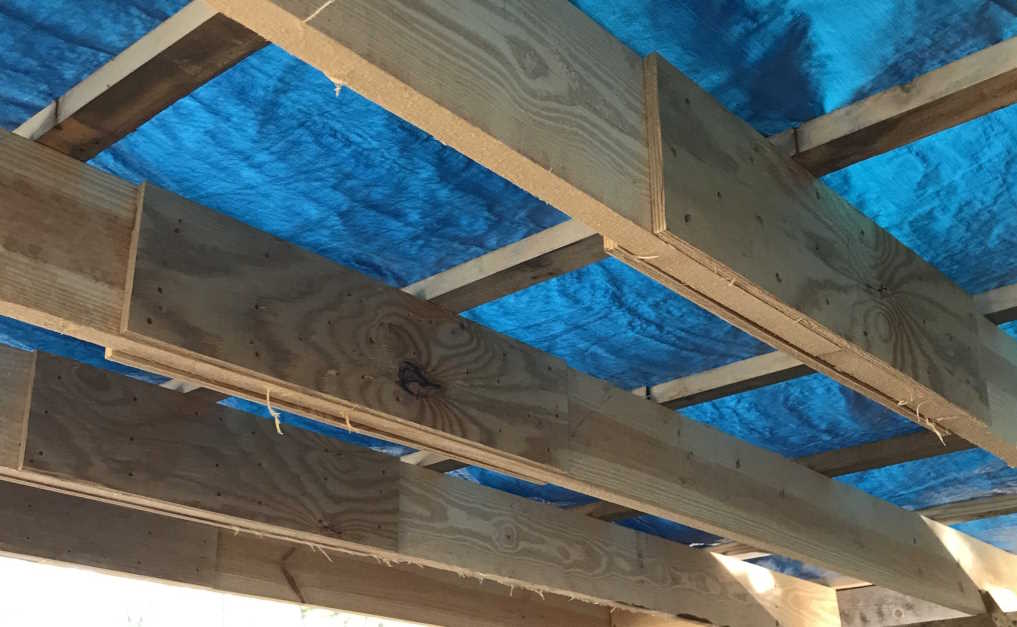
Picture of rafter spliced with plywood. Count the nails in this example. Remember 8D sinkers will go through the wood and partially penetrate the plywood gusset on the other side for extra holding power.
Pictured above is a 2×6 rafter spliced together using 3/4” plywood. Very strong connection. In this case the rafter as a whole is actually stronger than it would have been because the splice is more than adequate and the plywood adds to the strength. In this case the framer just needed a longer rafter. Use your common sense when deciding how many fasteners are needed. Splitting the wood does no good. In this case the framer used 9- 8d nails on each side of splice which is adequate in this case. That’s 18 nails on this side and 18 on the other side for 36 nails in all. An 8D sinker will partially penetrate into the plywood on the backside which adds to the strength. It is nailed through from both sides. The date code on the plywood indicated it was framed in 1995 with no sag indicated.
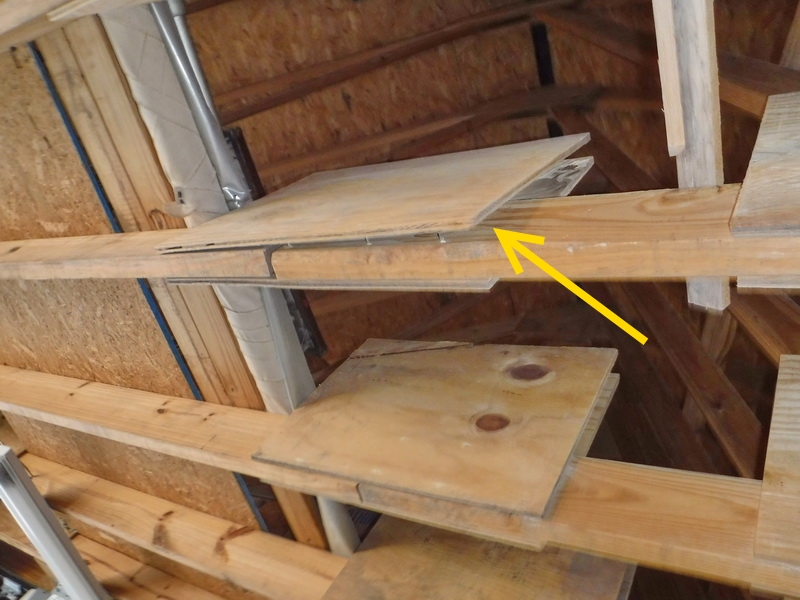
Picture of rafters spliced with plywood strips.
The framer in this scenario just needed longer rafters for his shed. It looks like about 10 8D sinkers nails on each side of the splice. That’s 20 on each side of the rafter for about 40 nails in all. Good job and no sag detected.
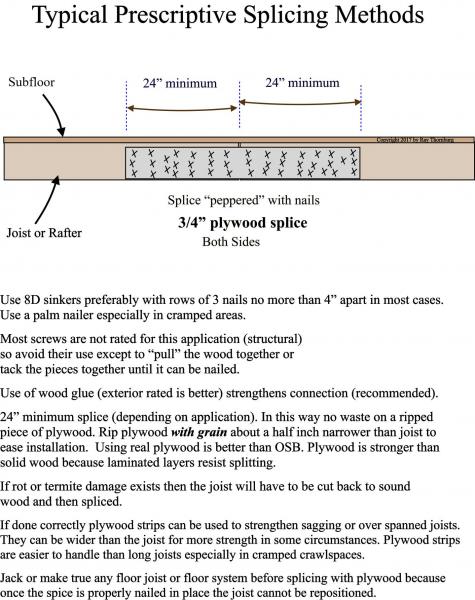
Illustration of prescriptive splicing techniques.
Pictured above is a diagram of some recommend prescriptive repair techniques for floor joists. Some allowances can be made on the length and thickness of the plywood gussets to suit your particular needs. While it is prudent to “over engineer” your repair; it may be acceptable to use 1/2” plywood or a somewhat shorter gusset depending on your circumstances. The strength of the connection is dependent on the shear strength of the nails so use plenty (driven straight and not slanted). Do not use screws because most are not rated for structural applications. If the repair was engineered then the repair technique would be drawn out on paper, stamped with the engineers approval stamp and it would list the number and type of fasteners needed.
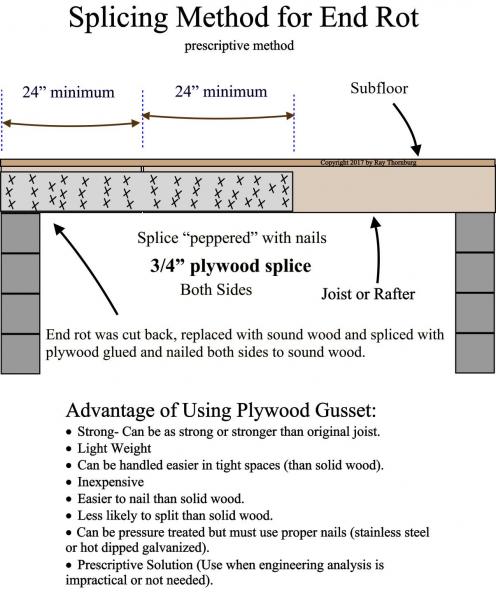
Picture shows the advantage of using plywood to splice a joist.
Pictured above is joist repair method for end rotted joist using plywood and some suggestions for best practice. Splicing with plywood can have some advantages over splicing with a solid joist in many situations. Use common sense when deciding how many fasteners to use. Use an adequate amount however it does no good to split the wood with too many.
So when is splicing only on one side acceptable? For example in most of the examples above a short joist is filled in and spliced on both sides with sound wood. This helps relieve compression and tension forces resulting from loads imposed. Sometimes it’s ok only to splice on one side for example when adding rafter tails to rafters that already bear on the top plate. Another example that could be ok is adding to the top of a rafter that is too short because the contractor ordered lumber which is 8″ too short. In these case the load imposed are not very much for the amount of fasteners typically needed to make such a splice work so would be ok in most circumstances.
Floor loads however are greater so we would discourage the temptation to only splice on one side. This should be evaluated on a case by case basis but if it absolutely has to be done then nail it with plenty of nails from both sides (not slanted) and with plenty of overlap.
In the field I noticed a lot of workmen cut a sister short on one side or another to get it to fit between the 2×2 ribbons. It would be better to remove the ribbon, install the sisters and replace with new ribbons so the sister has adequate bearing on both sides. It might actually be easier this way. Resist the temptation to reuse the old ribbon as it is probably too chopped up to do any good by the time it’s removed.
Replacing A Girder
Up till now we’ve only talked about repairing a joist or a rafter. How about when we need to repair a girder or sill? For the most part you cannot sister a sill or a girder because you cannot sister to compromised wood. This is also because loads are resting directly on the girder. Girders and Sills should be replaced when they rot or have termite damage. Some people will try to hide the rotted board by placing a nice treated piece in front of it or sometimes even under it. Then they will run joists to it like the rotted girder doesn’t exist. This is poor practice at the very least. Whenever possible rotted girders should be replaced with new wood. I think where people run into problems then they’re not thinking outside the box as far as how to replace the damaged pieces. Girders do not have to be dimensional lumber. They can be engineered lumber or smaller members glued or nailed together to form larger component.
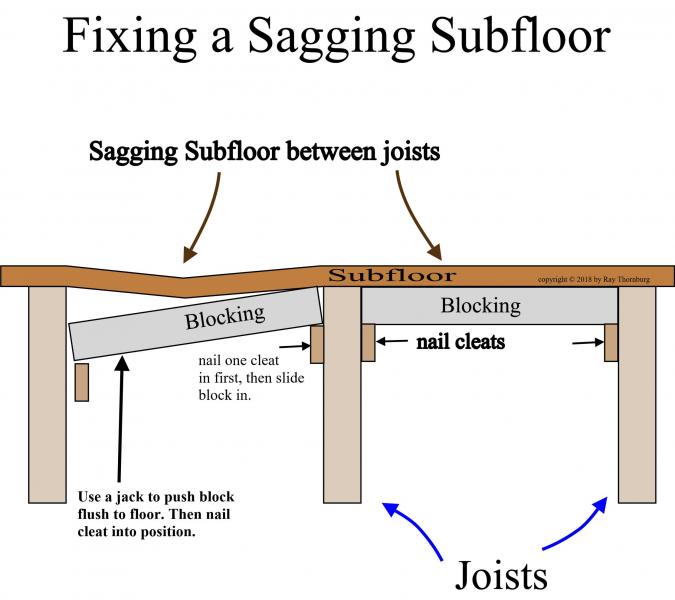
Picture shows one way to fix a sagging subfloor with blocking.
Often we’re presented with a situation where the subfloor has gotten wet from a leak or has a weak spot. When replacing the subfloor is not practical like when cabinets are in the way etc. then adding blocking from underneath can help. Picture above shows how to easily fix a sagging subfloor. You’re want to cut some 1×2 cleats, measured down the appropriate distance attach it, slide the block in, jack it up with a floor jack or car jack, install the other cleat, add fasteners into blocking as needed. Repeat as needed. This method is suggested because trying to push the subfloor up with one hand and nailing it with another is almost impossible especially if you want your floor flush.
Now let’s see what we find out in the field.
Plywood gusset failing due to inadequate nailing.
In this picture the framer did a good job making the job built trusses but failed miserably on nailing the gussets. Seems he only nailed the gussets on one side thinking the nails were long enough to penetrate the other piece or maybe he just got lazy. As you can see they are coming apart and so the truss could fail. The gussets should be face nailed from both sides.
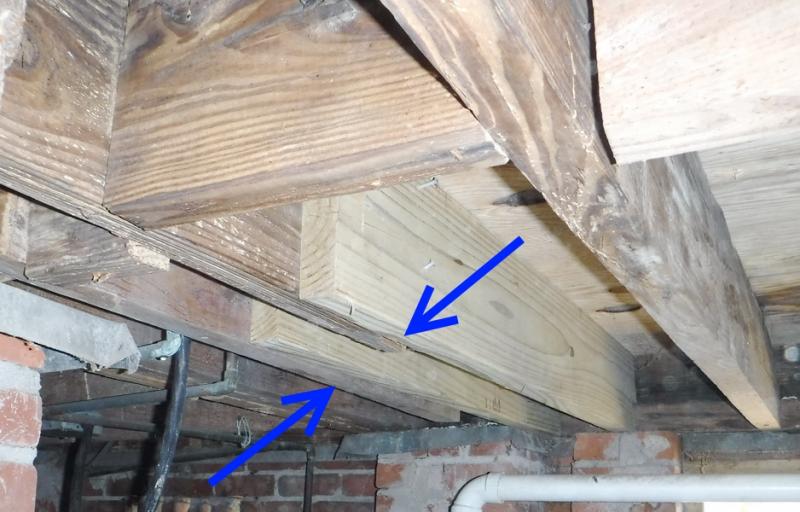
Picture of inadequate joist splice resulting in failure.
Here is a pathetic attempt to splice some floor joists under the bathroom. The long view makes the overlap seem longer but I believe the nearest one is less than a foot with very few nails. Drooping and joist sag can be seen in the photo. Believe it or not this kind of poor workmanship is not that uncommon. It would have been easy to do it right, but they chose not to.
Blue Palmetto Home Inspection serves the entire Charleston SC Lowcountry area!
Updated article from 11-9-17 written by Ray Thornburg
1 thought on “How to Splice a Joist or Rafter”
Commercial Water Damage Restoration
Admiring the time and effort you put into your blog and in depth
information you present. It’s nice to come across a blog
every once in a while that isn’t the same outdated rehashed material.
Excellent read! I’ve bookmarked your site and I’m including your RSS feeds to my
Google account.
Admiring the time and effort you put into your blog and in depth
information you present. It’s nice to come across a blog
every once in a while that isn’t the same outdated rehashed material.
Excellent read! I’ve bookmarked your site and I’m including your RSS feeds to my
Google account.