Most modern homes are on a public utility but for those of us who live out in the country we might find out that the home we’re thinking of buying is serviced by a private well. I actually prefer well water and it comes with an added benefit of having no water utility bill. However, unless this well is brand new we recommend allowing us to inspect the well to make sure it is operating correctly and is in good condition. I don’t know how other inspectors inspect the well but I remember the first time a realtor saw me checking the well out he said “wow, I’ve never seen an inspector do this before”. Properly evaluating the well could easily add an extra 1/2 hour to the home inspection process. So how does the inspector evaluate a well. We’re about to find out.
Well Location
The inspector should note the location of the well, and the associated tank and make sure that the well is not close to any septic systems, septic drain fields or other environmental hazards. An example of an environmental hazard might be a well too close to a pig pen, farm fuel tanks or fertilizer stations for instance. For residential wells being too close to a septic system or too close to a house are the most common deficiencies. Here are some clearance requirements for wells located in SC.
a. Sewer lines ……………………………………………..…………………………………………. …. 20 feet
b. Lakes, streams, surface-water bodies …………..…….…………………………………….. 50 feet
c. Septic tank/tile fields …………………………………..………………………………………….. 75 feet
d. Animal feedlots, barns, stables ………………………………………………………………… 50 feet
e. Waste disposal–land application sites …………………………………………………….. 100 feet
f. Waste treatment lagoons …………………………………..………………………….………… 100 feet
g. Chemical, herbicide, pesticide and petroleum storage or handling sites…… 100 feet
h. Landfills ……………………………………………………………………………..…………………….. 100 feet
i. Hazardous waste landfills/surface impoundments …………………………………… 100 feet
j. Radioactive waste landfills ……………………………………………………………………… 100 feet
k. Property lines and buildings……………………………………………………………….….… 5 feet
Well Pumphouse
A good pump house is often overlooked and sometimes missing altogether. Often they are not well considered and just thrown together or neglected for years. The inspector will want to make sure the pump house is not infested with rats, vermin or black widow spiders. This happens more often than you think. A good pump house will have a good roof, access door and will not be damaged by termites. If there is termite activity in the pump house it increases the chance of finding them in the house. The condensation on tanks and piping tends to add moisture to the ground around the well and this is attractive to termites. So termite damage at the pump house is not too unusual. Since you don’t want to spray dangerous chemicals near the well a Sentricon ever active bait station may be the only logical solution for termite control near the pump house. Ask your pest control expert about this. The pump house should not be used to store paint, lawn fertilizer or chemicals. Also it’s a good idea to have a system for freeze protection. More on that later.
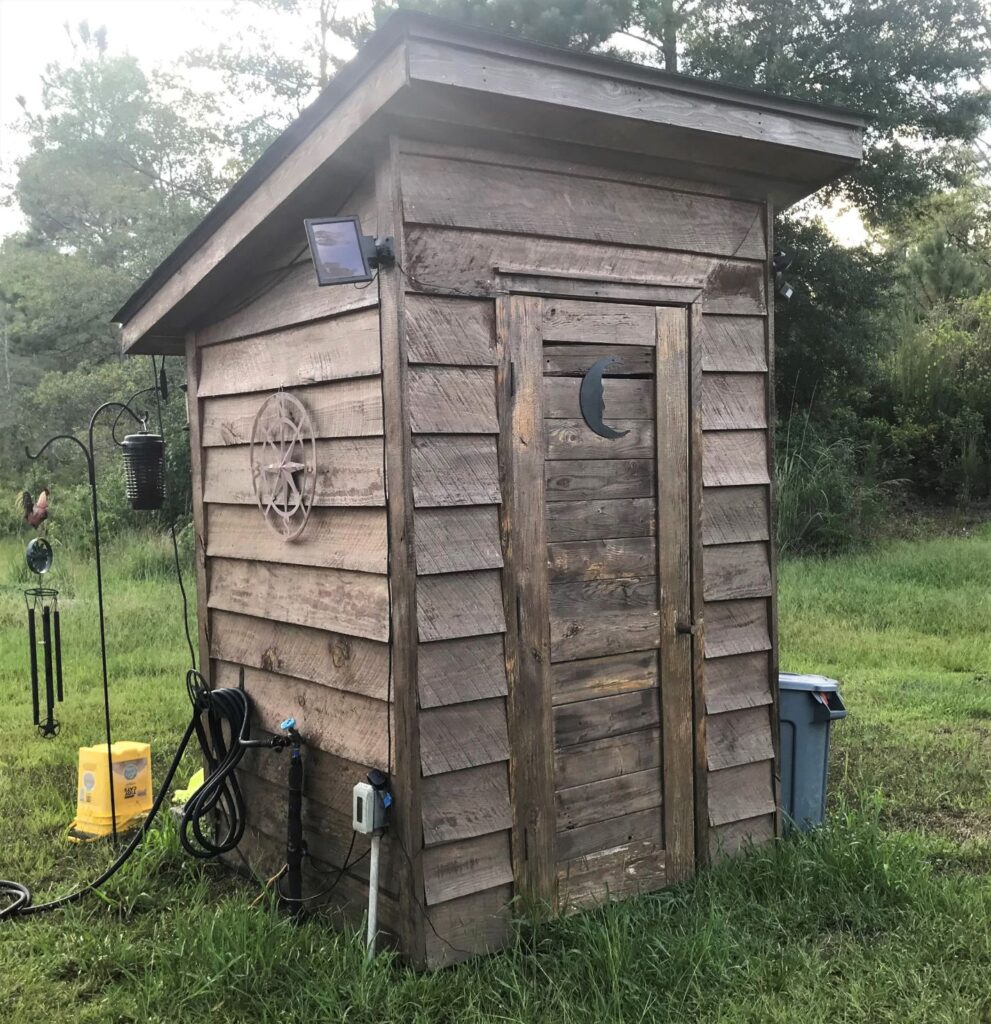
A pump house doesn’t have to be boring. However it should be easily accessible and have space to work on the equipment. The owner of this pump house wanted a bit of country charm by making it look like an old fashioned out house. This one has a concrete floor and shelves inside for storage. I’ve also seen, for those on a budget; plastic decorative rocks that are designed to cover the pump and tank. They are light can be lifted off easily to work on the equipment.
Well Electrical
The well electrical circuit is required to be on its own dedicated circuit. On newer homes a disconnect is required within sight of the pump motor. The wiring should be the type allowed for underground use. The inspector should note the voltage of the pump motor. Often home owners try to tap in to the well circuit to install an outlet or light and typically this is not allowed. In most cases if you want an outlet at the pump house (to run thermostatically controlled freeze protection for instance); another circuit must be ran.
Well Components
The well casing should extend out of the ground a minimum of 12 inches. The inspector should note the size of the casing. Also the casing should have a lid with a rubber seal. The inspector should estimate the size of the tank, it’s apparent condition, the condition of the gauges and the type of piping used from the well to the home. If the motor is visible he should note if the motor is deep well type, shallow or the jet type (more on this later). It’s a good idea to take a picture of the electrical rating on the motor. There should be a faucet at the well itself. In SC a spigot is required at the well head. The inspector will have to listen to when the pump kicks in and watch the gauges. If there is no faucet at the well it could be an inspection restriction for certain tests. More on that later.
Well Types
The inspector should note the type of well. So the three most common types or wells are:
- The Shallow Well Pump– Shallow wells go down at the most 25 feet ( typically 20 feet). During a drought a shallow well could run dry because the water table would drop below the foot valve. A shallow well has one pipe going into the casing and the pump will be visible above grade.
- A Jet pump can pull water up to about 80-100′ max. It uses centrifugal force and a special foot valve to pull water up farther than a shallow well. A Jet Pump will have two pipes entering the well head casing and the pump will be visible above grade.
- A deep well pump works by pushing water (instead of pulling). So it is possible to push water a much, much greater distance. A deep well pump is lowered into the well casing and the electrical cord goes into the casing to power the pump. So on a deep well system the pump itself is not visible. Deep well pumps are generally more reliable and can deliver greater pressure than the other types.
With any of these types it is impossible for the inspector to know at what depth the well pipe or pump is set. It is sufficient that is is set below the water table far enough so at times of drought it is not affected. Other types of shallow well types do exist like the sandy point but they would not be considered reliable for household needs.
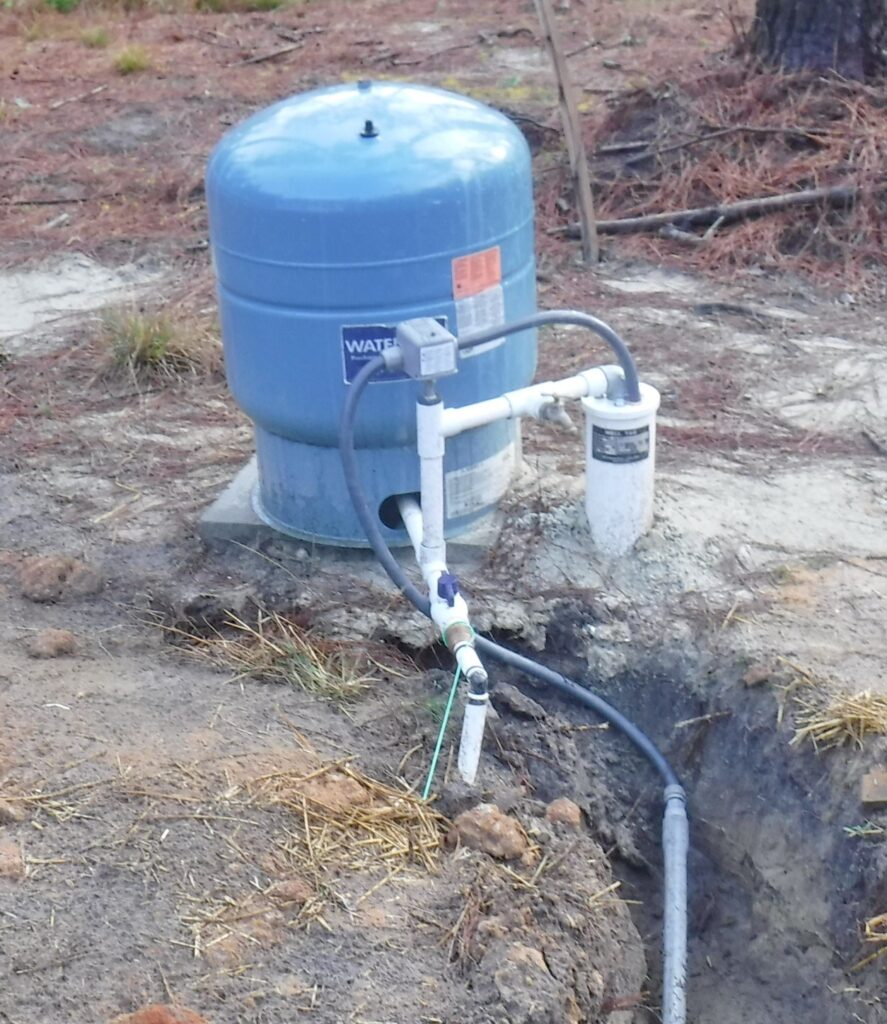
In the picture above is an example of a deep well (it has a submersible pump). It is a newly constructed home and the well is newly dug and you can see that some of the wiring is not yet covered with dirt. We think that the tank itself should have been raised a bit. Maybe they could have placed it on some concrete blocks. In this way it would be easier to pour a slab to build a pump house on. The electrical disconnect is attached to the house in this case.
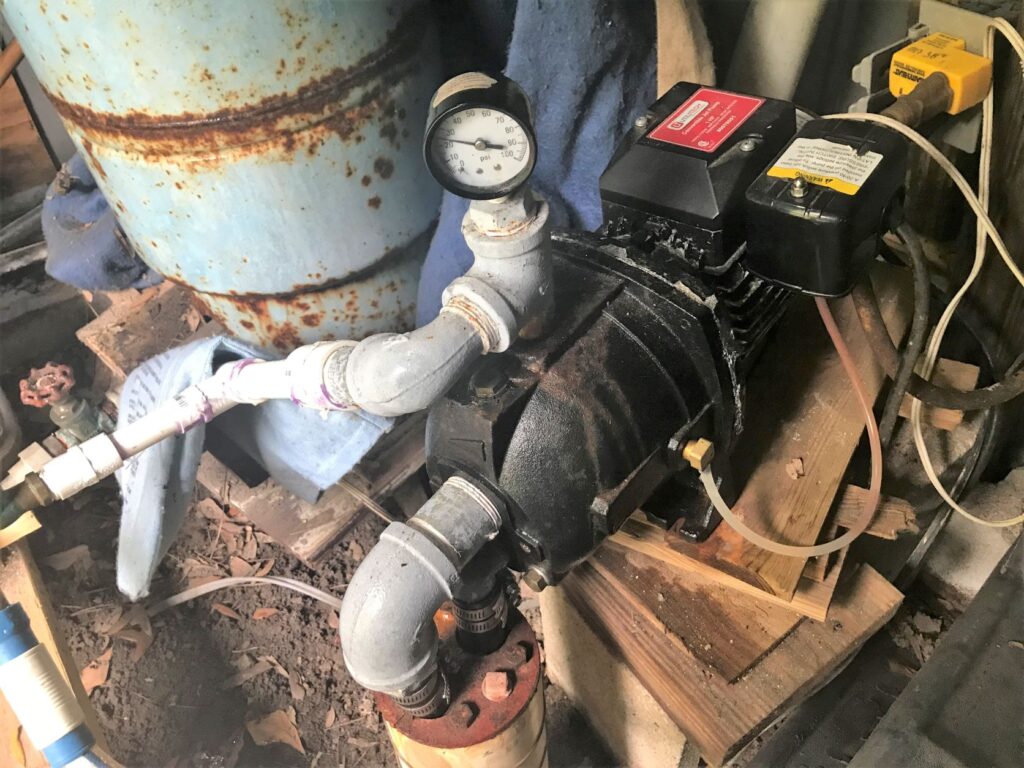
In the picture above shows a deep well pump. A deep well is classified as over 25 feet deep. It is the jet type. A jet pump can draw water up to about 80- 100 feet. A jet pump will have two pipes entering the well casing. There is no way of knowing how far the pipe extends into the ground. However the owner of this well indicated it was drawing water from 50 foot down.
The owner of this well is using a thermostatically controlled outlet (yellow) to plug in a heater. It will only turn on when the temperature drops below 36 degrees.
Well Information
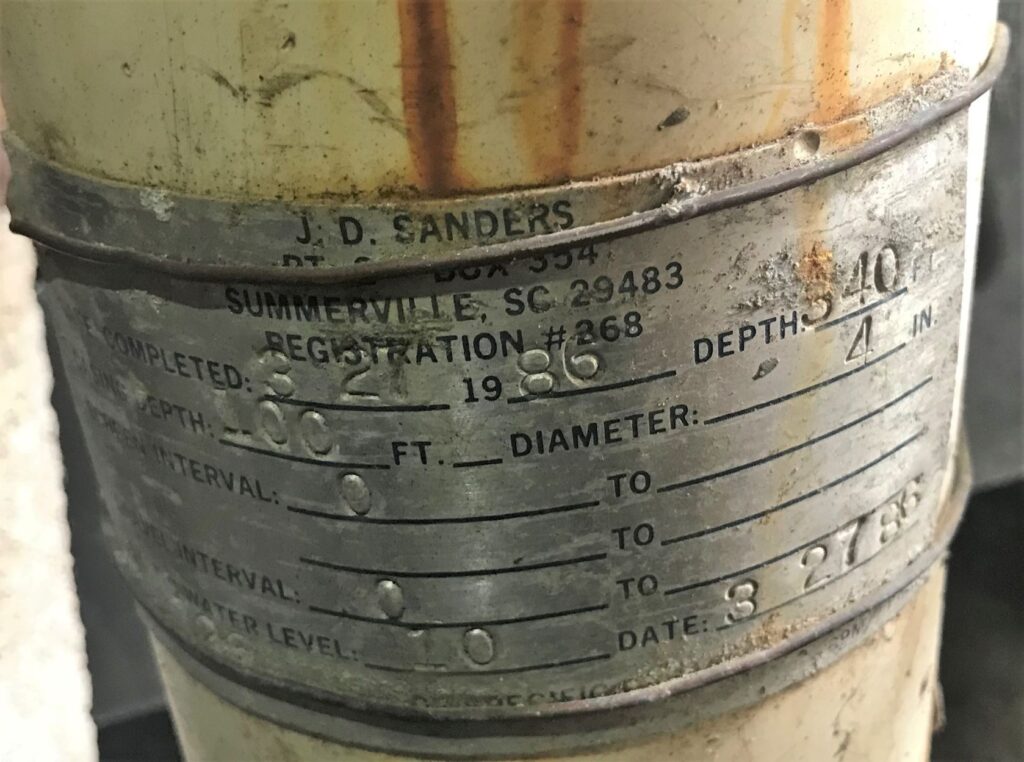
Wells are required to have a metal etched data plate attached to the side of the casing. This data plate will name the company that drilled the well, date it was drilled, the drilled depth, casing depth and the static water level at time of inspection. It will also list how many gallons per minute the well was producing. Some older wells will not have this data plate and sometimes the data plate falls off or is difficult to read. The example above is an embossed tag which holds up really well over time. So he did a really good job. Occasionally I’ll see tags which are only scratched out or sometimes only a magic marker is used. A marker would soon fade. Tags that don’t last are pretty much useless. The inspector should photograph the data plate and insert it into the report or keep for his records. In SC all wells are required to be identified with this information immediately upon completion. Also all wells are required to be constructed or (properly abandoned) by well drillers who are licensed by the SC LLR. The exception to this rule is homeowners constructing a well on their own property for their own use. However a permit may still be required. Compliance with state and local regulations are outside the scope of a home inspection.
Well Flow Rate
The inspector will need several 5 gallon buckets, a hose pipe, and a stop watch for this test. The inspector will measure the amount of water the well can produce in one minute by filling the buckets. The minimum acceptable for a 4 bedroom house would be 3.5 gpm and even that might be too low for most people to be happy with. After this test and the drop down test which we’ll discuss next the water should be ran for at least 15 minutes at full blast or at least 3.5 gallons per minute while being monitored. The inspector should have a gauge to measure this to be sure. Now this is not a true yield test as a yield test could take several hours to perform while being monitored. Few home buyers will want to pay for this and to be honest wells rarely go dry around here due to high water table. However it does give the inspector an indication of the wells condition. Problems with the well usually present themselves during this test. For instance if the well appears to be spitting or sputtering at high flow rates, or if the pump runs continuously without turning off. Occasionally the well will fail to bring up water during this test. The inspector should record his findings and report any deficiencies he suspects to the client.
The Well Tank Drop Down Test
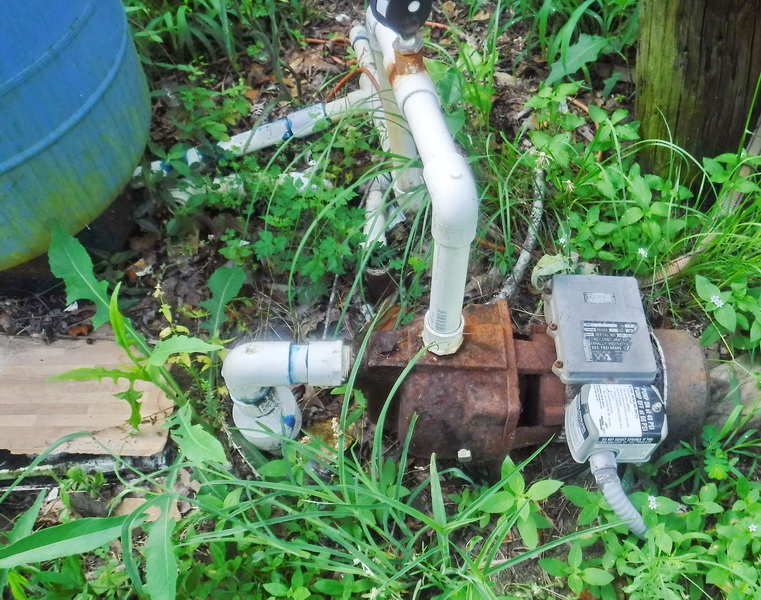
The tank draw down test will help you determine how your well is adjusted. Well tanks can come in many different sizes. The larger the tank the more reserve it has before the pump kicks in to refill the tank. One of the most popular sizes (around here) is the tank pictured. It is about a 20 gallon tank and it is about waist high. There may be a model number on it you can look up. Larger tanks have an advantage in that there is less cycling and more water is held in reserve for more consistent water pressures and delivery. Consider doing a tank draw down test if you notice air in the lines or the pump is quick cycling.
To start the tank draw down test quick check the tank by tapping on it with a screwdriver. It should never appear completely full but it should never appear completely empty either. If the tank is too full the bladder has probably ruptured or it is grossly out of adjustment. If the tank appears too empty then the pump may quick cycle which will shorten the life of the pump and use more electricity. However, the only real way to tell if a well system is operating correctly is to run some water. We’re going to note the cut in pressures, and cut out pressures. This is when the pump turns on and off. Set points can vary depending on personal choice, type of pump, and pressure needs of the home. Common set points are 20/40, 30/50, 40/60. These set points can be fine tuned somewhat if desired using controls on the switch.
For our tank draw down test we’ll need a few 5 gallon buckets. You’re going to measure the volume of water the well produces from the cut off point (pump turns off) to the cut in point on the motor (motor turns on). Simply run the water on the ground until the pump turns on and then turn the water off. Then listen for the when the (pump turns off). Then run the water into the buckets until the pump turns on. Estimate the number of gallons output and that is the draw down amount. A 20 gallon tanks proper draw down will be about 6.5 gallons for a 20/40 switch. As the pressure setting goes up the amount of draw down will decrease. It’s typically a little less than a third of the tank size if the system is 20/40. For a 30/50 it’s a about a gallon less. If it’s a 40/60 switch you may see maybe 5.4 gallons so the amount of draw down is dependent on the pressure setting (and tank size) and brand name. Some brands of tanks will advertise their draw down for different pressures. The point is, if your draw down volume is significantly lower or higher then some adjustment is needed to the tank pressure. Tank pressure should be set when the system is empty of water and it should be about 2 psi lower than the cut on point. Systems can loose air occasionally and it is a good idea to check it occasionally for optimum efficiency. After you perform the flow test and the drop down test make sure the to run the water for at least 15 minutes. I’ve had wells fail half way through the 15 minute mark but those were the sandy point type or the shallow well type during a dry spell. If a shallow well pump starts to suck air then you can switch it to the jet type and go deeper provided the casing is large enough for two pipes.
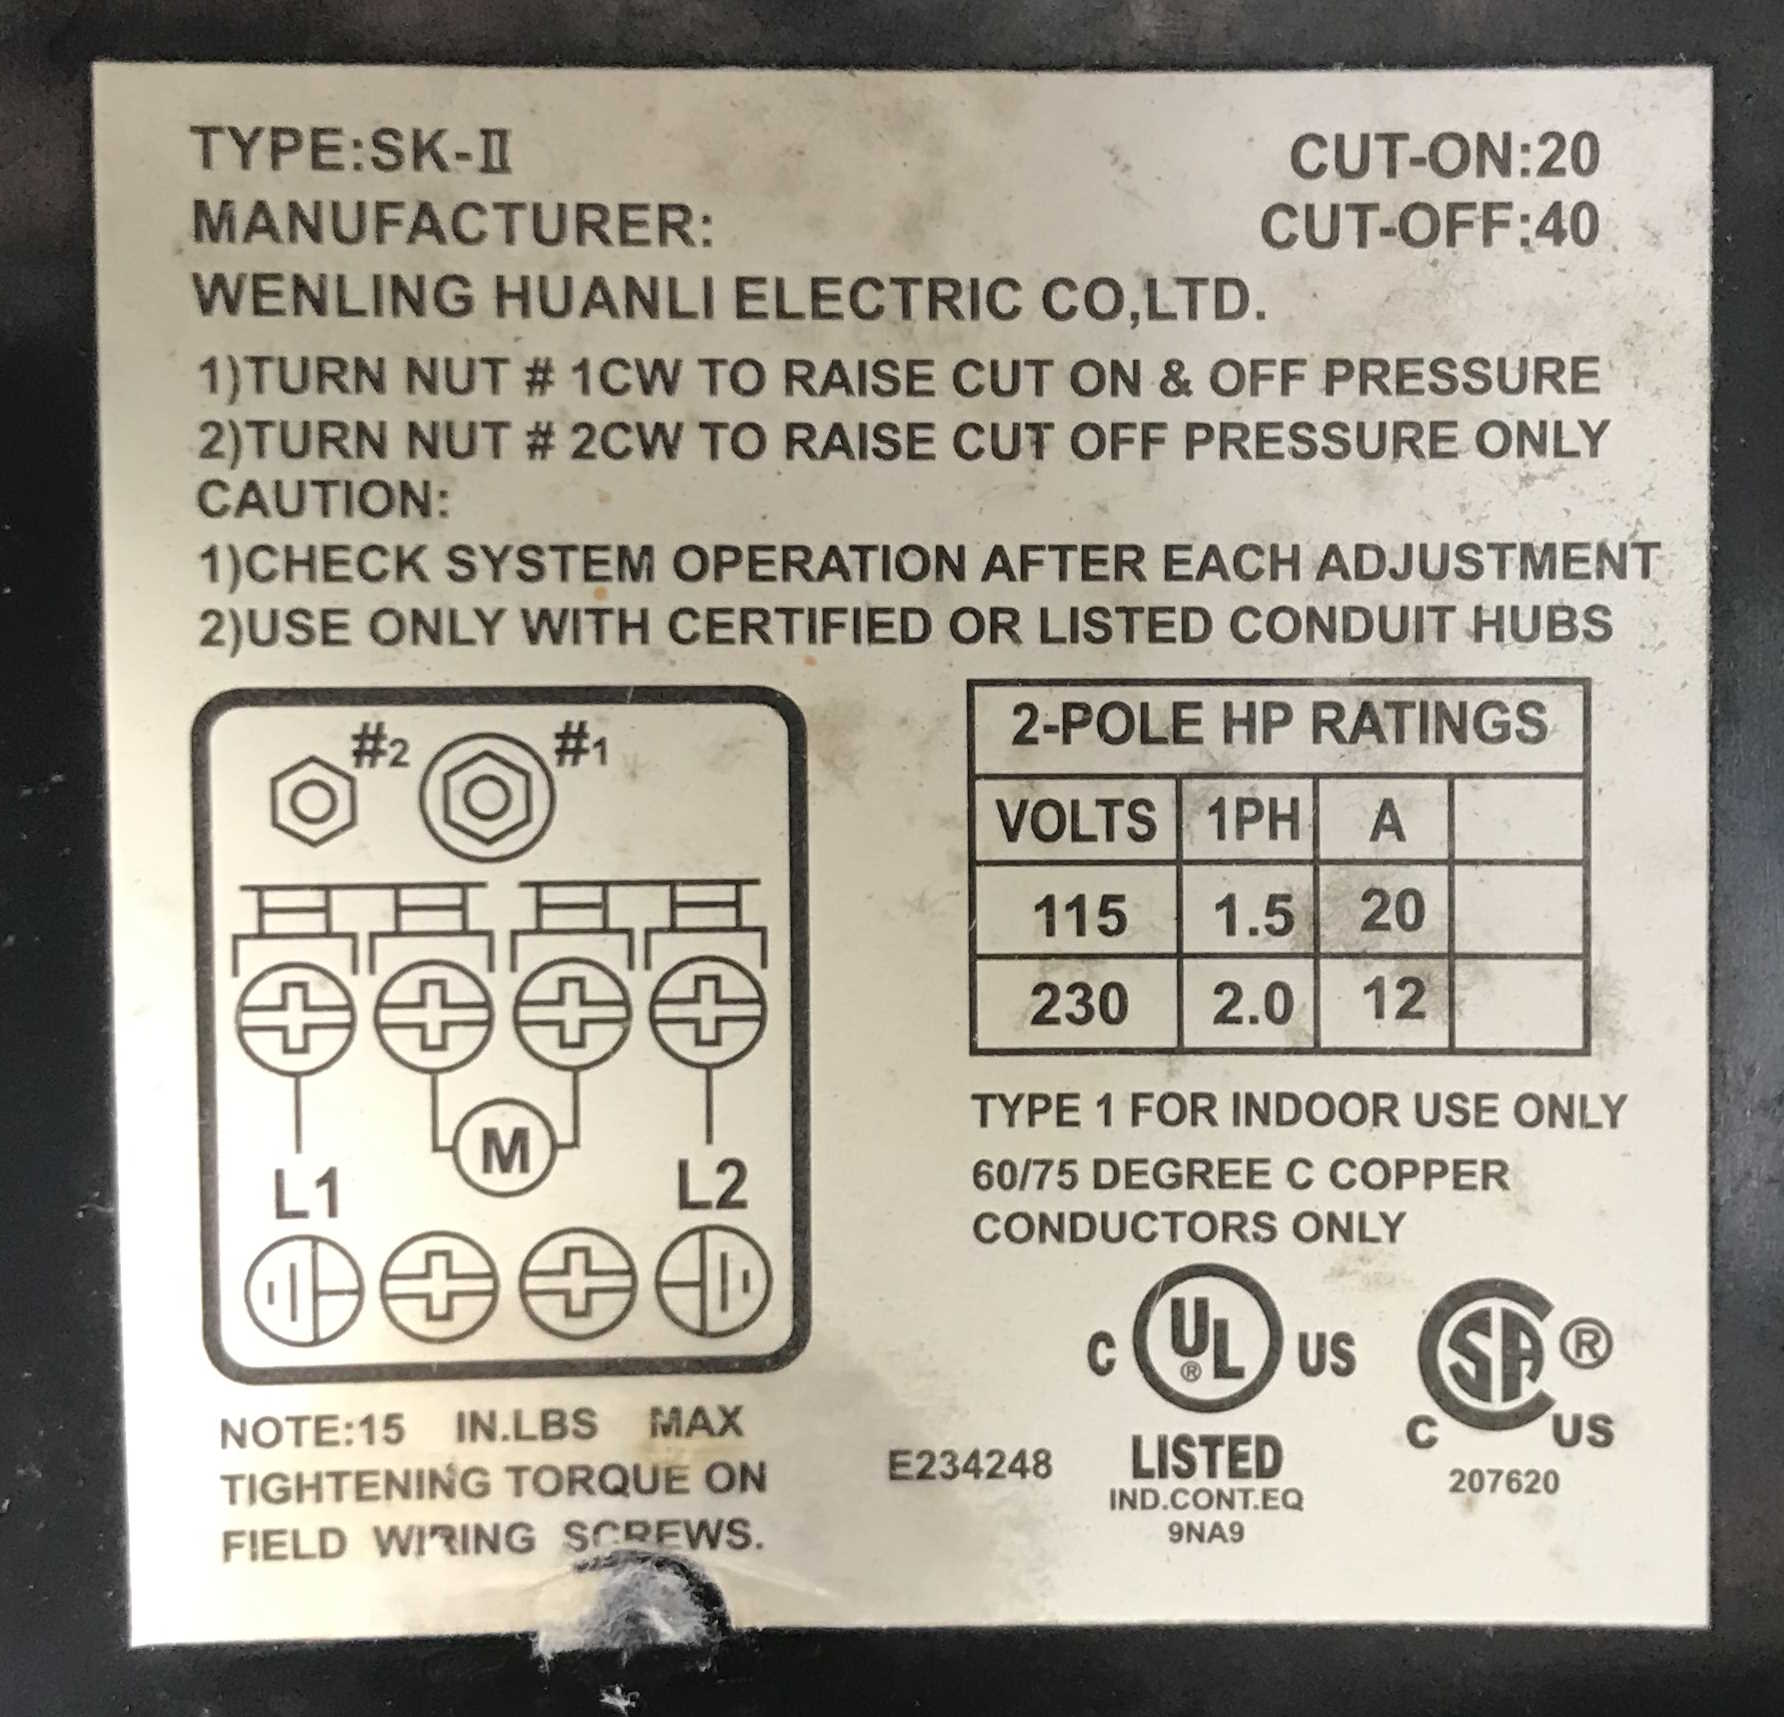
About Pressure Settings
The pressure setting for your well switch are written on the inside of the switch cover. Common switch designs are 20/40 psi, 30/50 psi and 40/60/psi. The kind of pump you have often determines the size of the switch. Some pumps come with a switch when you buy them. In this case the manufacturer determined the kind of switch should go with the pump. Generally however the stronger the pump the higher the pressure rating of the switch. Deep well pumps often have a higher rated pressure switch because they’re just stronger and can produce more gallons per minute. However too strong a pump can shorten the life of the motor. You want the pump to run for at least a minute before it shuts off.
If you look at the label under the pressure switch it’ll indicate how to adjust the pressure. The larger nut and spring will adjust the whole range. For instance if you just need a few extra pounds of pressure turn the large nut one complete turn and your 20/40 just became 23/43 psi or there about. Of course the tank will have to be adjusted also. The tank needs to be 2psi less than the cut in pressure. You have to drain the tank to properly pressurize the tank to this setting. The small nut and spring only raises or lowers the cut out point. Normally you wouldn’t mess with this setting. The factory rating for this switch is in the top right of the label.
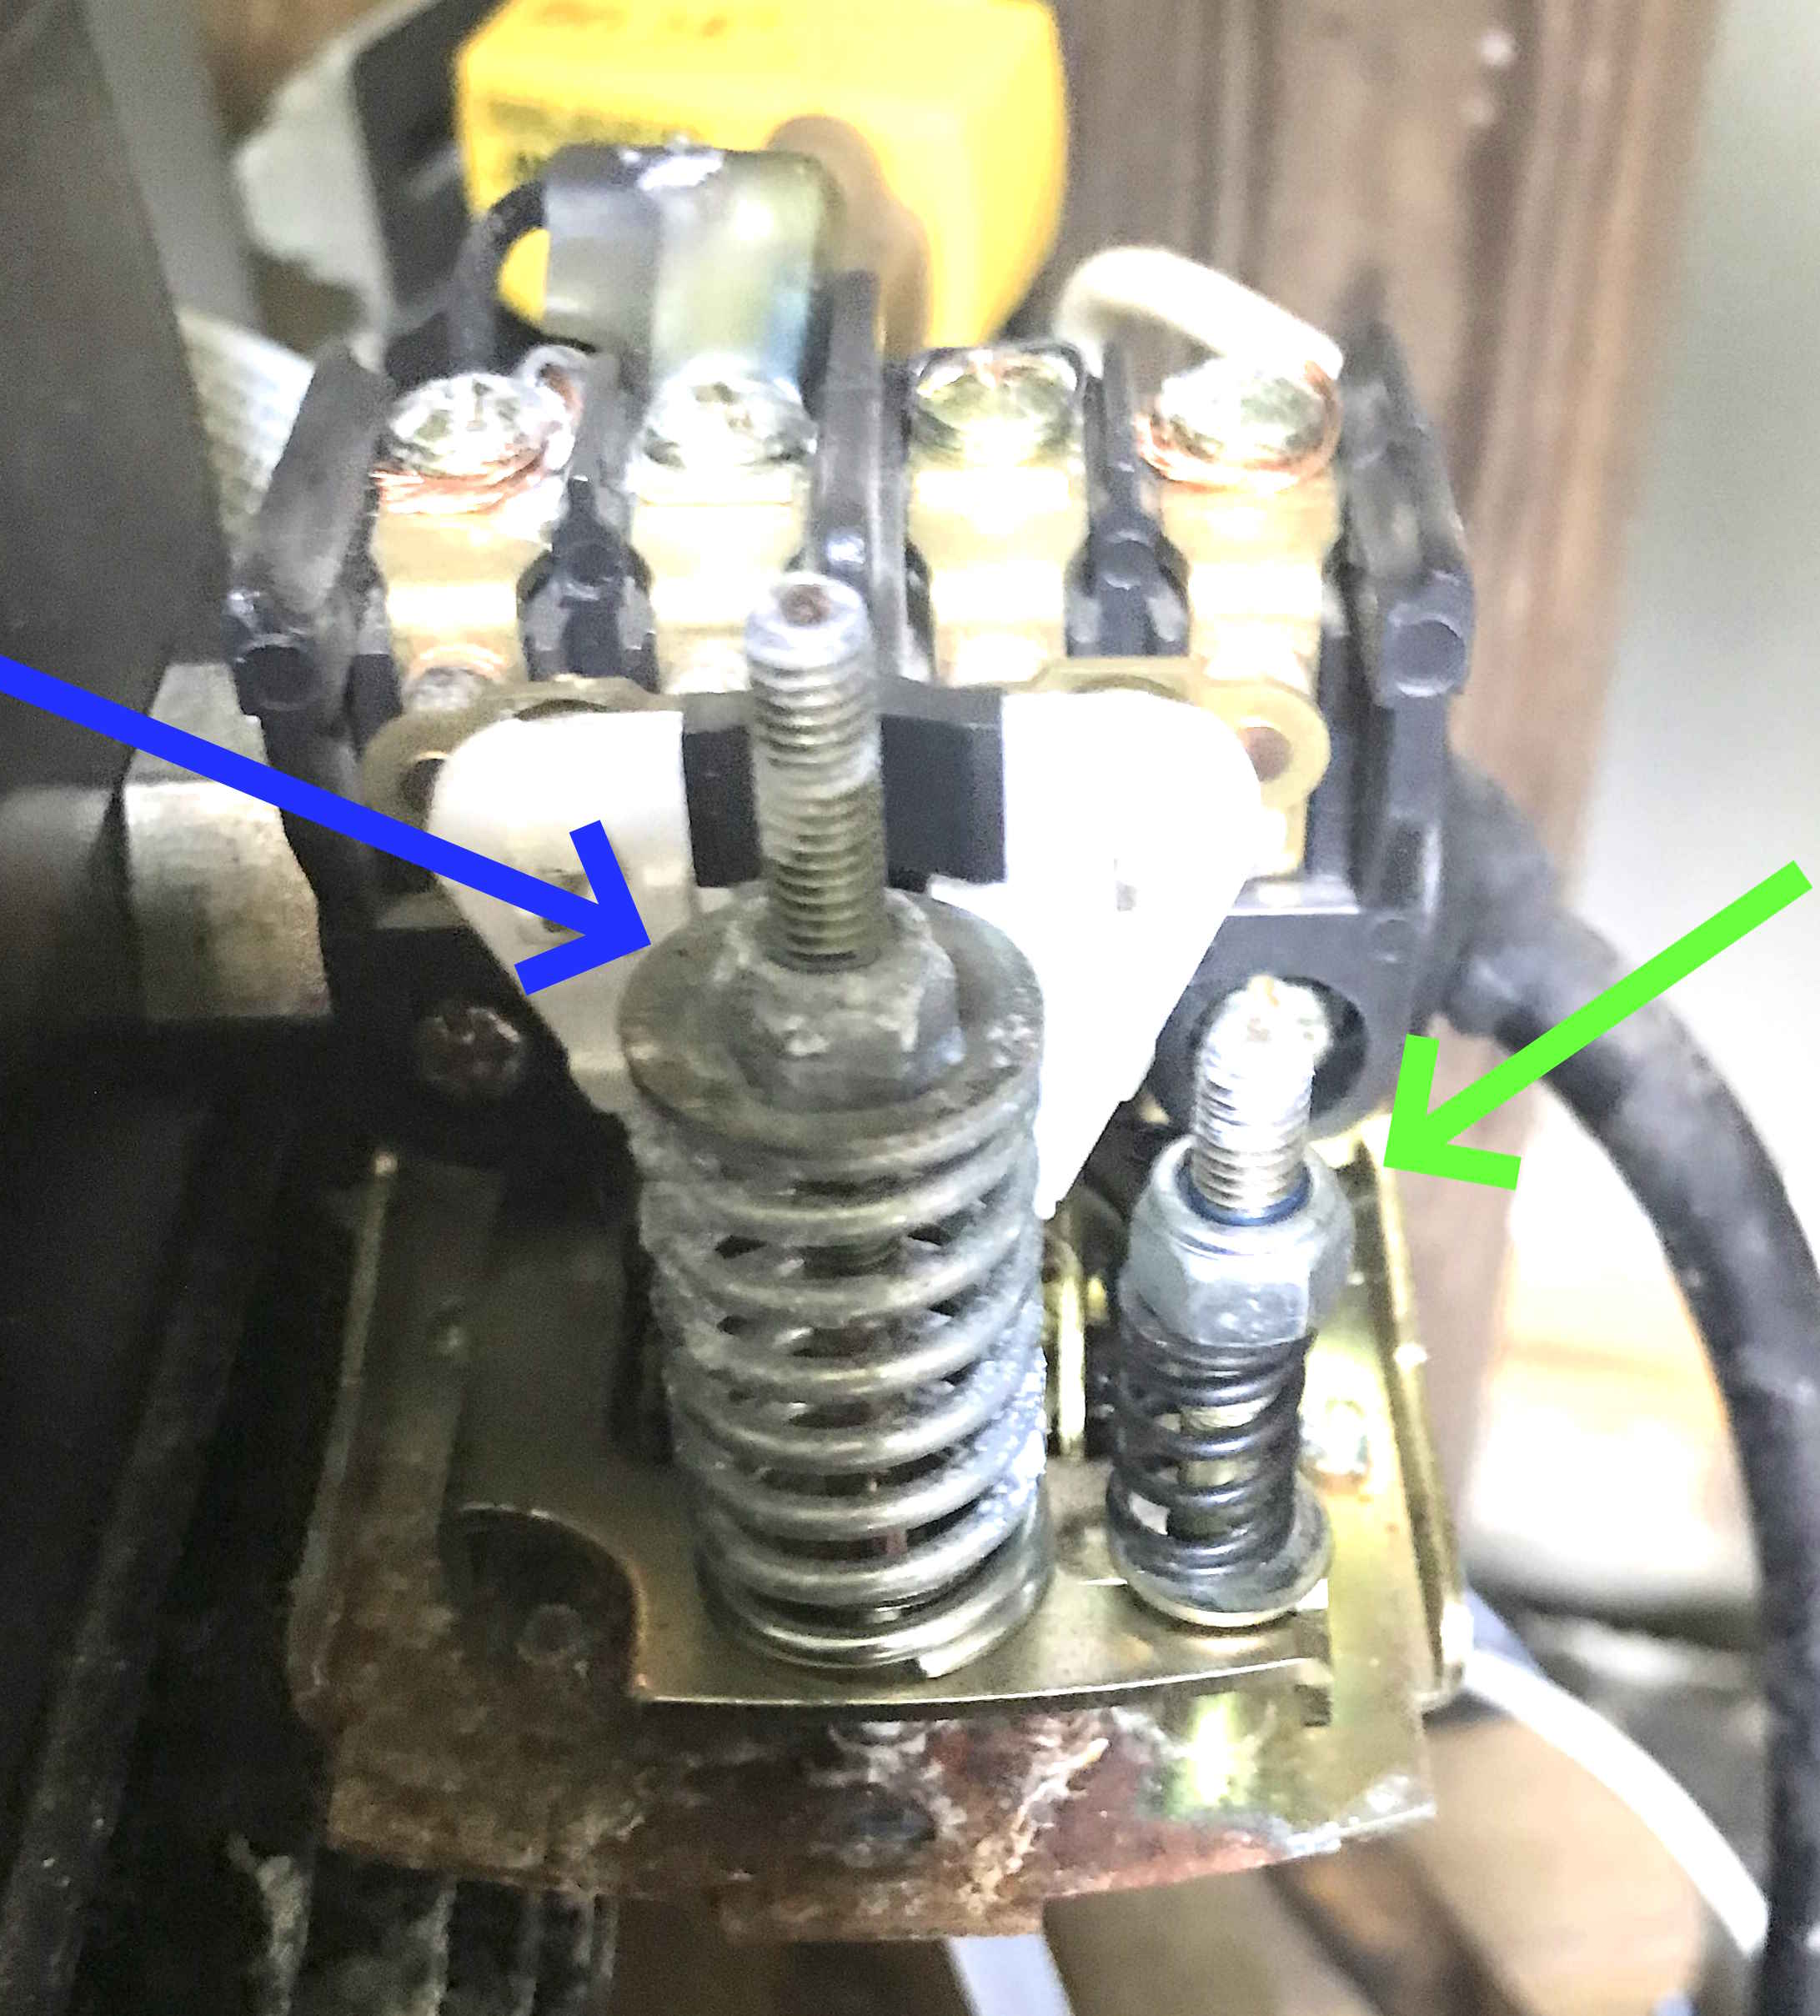
The image below shows the adjustment screws for the well switch above. The blew arrow points the range screw (#1 in the diagram) and the green arrow to the high pressure cut out point.
Water Analysis
Water analysis is not part of inspecting the wells functionality. However some lenders (FHA or VA) do require a FHA water test for financing sometimes. They require tests for bacteria, ecoli, coliform, nitrites, nitrates, and lead. At your request Blue Palmetto does offer this service for an additional fee and will collect the sample when we inspect the home and send it off to the lab for analysis.
The Sandy Point Well Type
I sometimes encounter a shallow well type I call a sandy point. The Sandy Point Well is a driven well. It has a well point with a screen around it and is literally driven (pounded in) or washed in with a powerful stream of water. The picture above shows one such well tip which was discarded under this home when municipal water was hooked up. These types of wells are shallow wells (less than 25 feet) and are often installed by amateurs. Sometimes they’re used for irrigation or for watering livestock. These types of wells often draw up sediment and are more susceptible to surface water contamination than a bored well. Often the volume of water it produces is less than standard (for a home). In my tests sometimes these fail during testing or fail to bring up a satisfactorily volume of water. When I encounter these types of wells they rarely if ever have a data plate which is required when a certified well driller installed the well. In SC you must be a certified well driller to install a well. So the absence of a data plate is a concern. The picture below shows one such well likely installed by an amateur, with the pump literally sitting on the ground. Not even a concrete block to hold it up! The tank is the same way (not supported properly). Note the absence of insulation and broken pipes laying around indicating past repairs.
Very good article, well written and easy to understand explanation. Now I understand how to do a drop down test. Thanks!